Showing posts with label Ranger. Show all posts

Saturday, November 02, 2019

Cupcake Birthday Cards

Is been exactly one (1) year since I made my last card! Wow! Times really flies! A lot has been happening and due to that, I am kind lost my interest in making cards as time is really not permitting me to do so.
Cupcake Birthday Cards

Nevertheless, I am back today to make some cards as I really in need of some cards especially birthday cards for my colleague and my best friend who birthday already passed.

Freshly Made Sketches #409 - A Sketch by Jen M.
For this card, I am adopting the sketch from Freshly Made Sketches #409 - A Sketch by Jen M. as shown above. I also adopting Seize the Birthday #177 - Candles.

The cupcake with candle is stamped on white square parenthesis dotted dies and colored using Copic markers.

Close-up: Cupcake Birthday Card - original sketch

Then on a pink and blue card base, a craft strip is attached onto each of card bases as shown in the sketch. The sentiments are stamped on the craft cardstock accordingly.

Close-up: Cupcake Birthday Card - clockwise turn sketch

Then, the cupcake dies are attached onto the card base as shown in the sketch using foam tapes for dimension. Two (2) black strips are attached onto the craft strips top and bottoms for fake borders.

Close-up: Glossy accent flame, shimmering frosting and gems

For final touches, some glossy accents are added to the flames. Some shimmers are added to the cupcakes as well. Two (2) gems are added to left side of the candles just to give some effects.

Close-up: Glossy accent flame, shimmering frosting and gems

Dimension : A2 size (4.25" x 5.5" or 10.8cm x 13.9cm)
Type : Vertical and horizontal fold
Inlay : None

This card is entering the challenge(s) organized by:
1) 
Freshly Made Sketches #409 - A Sketch by Jen M. (ends by 04 November 2019)
2) 
Seize the Birthday #177 - Candles (ends by 05 November 2019)
3) Brown Sugar Challenge #295 - November 2019 - Anything Goes (ends by 03 November 2019)

Supplies used:
Copic markers used: B02, B24, BG01, E23, E29, E51, R24, R83, RV23, RV25, V15, Y17, Y18 and YR31
Stamps used: Hero Arts CL382 Wonderful Birthday and My Creative Time WOW So Many Candles

Dies used: Unbranded Square Parenthesis Dotted Stackables Dies

Wednesday, October 18, 2017

Zipper Card: Birthday It's Not A Matter of Counting Years....

Zipper Card: Birthday It's Not A Matter of Counting Years....
Made this card for my best friend whose birthday is tomorrow and she is in Singapore. *Aiks* My birthday card to her is always late except last year which I manage to post on time.


Sketch Saturday Week #485
For this card, I am adopting the sketch from Sketch Saturday Week #485 as shown above.

Two (2) types of different pattern papers are trim into length with two (2) and three (3) pieces of each designs. They are then attached onto a yellow card base as shown the sketch.

Close-up: The zipper with hidden message underneath
I always wanted to make a zipper card with hidden message where the recipient can peel the liner zipper to reveal the hidden message. The zipper border dies and stamp set I bought long time ago are get to get used and inked up until I saw the sketch from Sketch Saturday Week #485 which is just perfect to insert the zipper. On a red strip, the zipper border dies is used to die cut the zipper function on it. Then, the hidden message is stamped onto the card base on top of the five (5) pieces of pattern paper. The red zipper strip is attach onto the hidden message as shown in the sketch.

Close-up: The butterfly
A butterfly body is die cut from a mixed colors using block stamping technique. The intricate of the butterfly is die cut using a gold stock. Once the butterfly body and intricate has been assembled, it is attached onto the card base at the left corner. It is purposely offset to give some interests.


Close-up: The sentiment
Finally, the sentiment is stamped onto the card base together with the 'pull here' instruction.

Dimension : A2 size (4.25" x 5.5" or 10.8cm x 13.9cm)
Type : Horizontal fold
Inlay : None

This card is entering the challenge(s) organized by:
1) Sketch Saturday Week #485 (ends by 20 October 2017)
7) Not Just Cards Challenges - Anything Goes (ends by 10 November 2017)

Supplies used:

Saturday, March 25, 2017

Birdies Wedding Congrats

Birdies Wedding Congrats
Made this card for my colleague engineer who is having his wedding dinner reception tomorrow night.


Tuesday Morning Sketches #395
For this card, I am adopting the sketch from Tuesday Morning Sketches #395 as shown above.

I decided to use these cute and adorable birds images as they mimic the couple where both of them are wearing glasses as well. All the images are stamped onto a white card stock and colored with Copic markers. Then, they are die cut using matching dies. On a white parchment paper texture card base, pattern paper with varieties of heart shapes and colors is attach onto it.


Close-up: Images on the stitched journaling card
On a pink embossed stitched journaling card die cut, the sentiment is stamped on the right bottom. Then, the images are attached onto it using dimension tape. A red/white twine is used to tie the tree trunk and the birdhouse. The whole stitched journaling card is then attached onto the card base using double sided tape.


Close-up: The shimmer on the hearts and glasses and the coat of glossy accents on the glasses
Finally, a red heart gem and some pink and red circle gems are attached to the upper left and right lower side of the stitched journaling card as in sketch. Some shimmer is added to the glasses of the birdies follow by a coat of glossy accent to make it more realistic. Some shimmer is applied to the hearts as well.

Dimension : 4.25" x 5.5" or 10.8cm x 13.9cm
Type : Top fold
Inlay : None

This card is entering the challenge(s) organized by:
1) Tuesday Morning Sketches #395 (ends by 26 March 2017)
2) Brown Sugar Challenge #243 - Anything Goes (ends by 30 March 2017)

Supplies used:
Copic markers used: B24, B28, B32, E31, E55, E59, R29, RV23, RV25, RV29, Y13, Y19 and Y21

Saturday, October 22, 2016

3D Rose Just Wanted to Say Thank You for All Your Help

3D Rose Just Wanted to Say Thank You for All Your Help
Made these cards for some of my associates that helped me in my recent case and situation. I been chasing them like crazy people for last few days of my case dateline and I am sure a lot pressures are on their shoulder. Thus, I hope these cards will show them how much I really appreciate their helps, urgent and priority on my case.


Viva la Verve Sketches - October Sketch 2
For this card, I am adopting Viva la Verve Sketches - October Sketch 2 as shown above. Nowadays, I am saving up some time by making two (2) cards using one (1) sketch either by mirroring or rotating the sketch. By doing so, I really can share more times as well as built up my cards stash!


Close-up: 3D Rose Just Wanted to Say Thank You for All Your Help - original sketch
I decided to make my signature 3D flower for this card. I stamp flower image three (3) times and colored them in Copic markers. One of them is die cut using the matching die while the other two (2) are trimmed accordingly to the portion I need. The leaves are stamped on a green card stock using green ink and die cut.


Close-up: 3D Rose Just Wanted to Say Thank You for All Your Help - 180 degree rotated sketch
On a trimmed vellum, I did some dry embossing. This is my first attempt of using vellum in dry embossing and it turned out well! The embossed vellum is then attach onto a yellow card base as in sketch.


Close-up: Sentiment in fishtailed banner
On an orange card stock, the sentiment is stamped and fishtailed on both ends. It is attached onto the card base, one on the bottom and another one on top.


Close-up: 3D rose with shimmer
Then, the base of the flower that die cut with matching die and leaves are assemble and attach onto the card base as in sketch. The 3D flower is then built upon it using foam tape.

As final touch, I add some shimmer onto the flower and fill the 'Thank You' sentiment space to make it all shine and nice! Two (2) white pearls are also added to the start and end of the sentiment sentence.


3D Rose Just Wanted to Say Thank You for All Your Help card and matching envelope
I also made matching envelopes for these cards by stamping the similar flower and leaves onto the envelope flap. This is my first time made a matching envelope and I just love it!


Dimension : A2 card or 4.25" x 5.5"
Type : Vertical fold
Inlay : None

This card is entering the challenge(s) organized by :
1) Viva la Verve Sketches - October Sketch 2 (ends by 03 November 2016)
3) Brown Sugar Challenge #221 - Anything Goes (ends by 27 October 2016)
5) Little Miss Muffet Challenge #149 - Anything Goes (ends by 02 November 2016) 

Supplies used:
Copic marker used: R20, R29, R35 and YG03

Sunday, September 11, 2016

Trio Lanterns Shine Brightly

Trio Lanterns Shine Brightly
Finally I could say that this is my Mid-Autumn Festival 2016 last card as I believe I had made enough cards to give away this year.

CAS(E) This Sketch #189
For this card, I am adopting CAS(E) This Sketch #189 as shown above. I made two (2) cards for the same sketch and only rotating my images' colors.

Close-up: Trio lanterns randomized pattern #1
I decided to paper piece the lanterns. Thus, I stamp the lanterns onto some polka dots pattern papers and trim them accordingly. On a red card stock, the lanterns are stamped again with its hanging line. The trimmed lanterns are attached onto the matching lanterns. A purple metallic card stock is circle die cut at the upper part. Then, it is attached onto the red card stock using foam tape so that it is dimensional.
Close-up: Trio lanterns randomized pattern #2

Close-up: Embossed sentiment in gold
The sentiment is stamped onto a vellum strip and gold embossed. It is attached across the purple metallic card stock circle as shown in the sketch. Later, the whole panel is attached onto a yellow card base.

Dimension : A2 card or 4.25" x 5.5"
Type : Horizontal fold
Inlay : None

This card is entering the challenge(s) organized by :
1) CAS(E) This Sketch #189 (ends by 15 September 2016)
2) Brown Sugar Challenge #215 - Anything Goes (ends by 15 September 2016)
3) Crafty Girls Creation Challenge 25 Anything Goes (ends by 22 September 2016)

Supplies used:

Friday, September 09, 2016

Shine Brightly with Embossed Gold Lanterns

Shine Brightly with Embossed Gold Lanterns
I am continuing my Mid-Autumn Festival cards today as the date to the festival is just next week. I hope I made enough cards to give away.

TGIF Challenges - TGIFC72 - Sketch
For this card, I am adopting TGIF Challenges - TGIFC72 - Sketch as shown above. The sketch is just perfect for the lanterns placement after I rotate it to the right!

Close-up: Embossed gold sentiment
I started out by stamping the lanterns and heat emboss them in gold. A line is hand drawn to connect the lanterns and heat embossed. The sentiment is stamped and heat emboss in gold as well.

Close-up: Embossed gold lanterns
Then, using distress ink, I colored the lanterns with clear Wink of Stella so that it will have shine on the lanterns that mimic the light glowing from within. In order to mimic the shine rays from the lanterns, a yellow ring is added to the edge of the lanterns using clear Wink of Stella.

Close-up: Shimmer on the lanterns
The background is applied with distress inks and later some water to mimic a night sky.

The scene is then attached onto a blue card base.

Dimension : A2 card or 4.25" x 5.5"
Type : Horizontal fold
Inlay : None

This card is entering the challenge(s) organized by :
1) TGIF Challenges - TGIFC72 - Sketch (ends by 15 September 2016)
2) Brown Sugar Challenge #215 - Anything Goes (ends by 15 September 2016)
3) CAS-ual Fridays CFC156 - Dimension & Bling (ends by 20 September 2016)
4) Crafty Girls Creation Challenge 25 Anything Goes (ends by 22 September 2016)

Supplies used:

Sunday, June 05, 2016

Lots of Hearts Wedding Congratulations

Lots of Hearts Wedding Congratulations
Made this card for one of my husband biker buddy who is having his wedding and dinner reception at Avillion Port Dickson. Initially only my husband will attend but after some confirmation and all, we decided to go as family. We also would like to take the opportunity to take the kids to the beach as promised.

Fusion Card Challenge - Something Blue
I am adopting the both the photo inspiration and sketch from Fusion Card Challenge - Something Blue as shown above even the challenge date has been past due. The photo just remind me of wedding cake.

Close-up: The groom and bride representative hearts
First, I stamp the hearts onto a trimmed white card stock and emboss them in gold embossing powder. Then, the background is distressed while leaving the hearts blank. The heart on the left is colored with blue to represent groom while the heart on the right colored in red to represent bride. I am using distress colors to color these hearts.

A washi tape that have red hearts pattern is attached onto a card yellow base as shown in the sketch follow by an alternate pink and red border sticker. The hearts background is then attach onto these strips using dimensional foam as shown in the sketch.

Close-up: Sentiment in embossed gold
The sentiment is stamped on a red strip and emboss using gold embossing powder as well. The strip is fish-tailed at the right end and layered onto the background as in sketch.

Close-up: Shimmers on the hearts
As final touch, some shimmers are added to the hearts as they are the main focus. Two (2) gems are added to the beginning and ending of the sentiment.

Dimension : 21.5cm x 10cm or 8.5" x 4"
Type : Top fold
Inlay : None

This card is entering the challenge(s) organized by:

Supplies used:

Wednesday, May 11, 2016

Texture Pastes and Free Birthday Present

Left: Simon Says Stamp Magical Birthday
Right: Ranger texture paste sample pack
On 08 April 2016, Simon Says Stamp send me an automated e-mail that contains a code of my free birthday gift if I purchase from Simon Says Stamp store which expires by end of April 2016. The free birthday gift is a Simon Says Stamp exclusive stamp Birthday Celebration as below.
During the same time, there is a 20% Ranger sale which valid until 10 April 2016. In view that I been wanting to get a jar of Ranger texture paste, I saw the opportunity to shoot two (2) birds with one stone! However, on 09 April 2016 when I tried to order and apply the birthday and the 20% Ranger sale code, only one coupon code is allowed! :( I e-mail Simon Says Stamp to ask if I can order two (2) separate orders using the birthday code and Ranger code coupons but shipping fees charged for one time only. However, to my disappointment, the answer is no. :(


Ranger texture paste sample pack
On 15 April 2016, Simon Says Stamp send me another automated e-mail to remind me on my birthday gift. Since the 20% Ranger sale has past, I tried to to compare the price point of the product versus the shipping fees from other online stores are offering. During the hopping, I discovered actually there is a three-in-one pack of Ranger texture paste which I believe it was released earlier this year. The three-in-one pack (or sample pack) come with texture paste in opaque matte, transparent matte and transparent gloss in 1 oz jar (the bigger jar is 3.9 oz). I find this sample pack is more suitable to me because:
  • it is in smaller jar which serve the purpose I may not use it as often
  • the price is cheaper
  • more variety of pastes

After much comparison, finally I find it is a wise choice that I go ahead to buy the Ranger texture paste sample pack from Simon Says Stamp. Although the product price and shipping fees are not as comparative to other online store, I get to have my free birthday gift - a plus point to remember.


Simon Says Stamp Magical Birthday
I ordered on 29 April 2016, a few days before the birthday code coupon expire but when I enter the birthday code coupon, the stamp applied to my cart is not Simon Says Stamp Birthday Celebration! It is Simon Says Stamp Magical Birthday (please refer photo above)! I am not sure why there is a change in the free birthday gift or perhaps Simon Says Stamp Birthday Celebration is out of stock. Actually, I really fond on Simon Says Stamp Birthday Celebration because of the elephant and balloon. Well, since it is a free birthday gift, I just take whatever it is as it is free after all. :P


Actual Simon Says Stamp Magical Birthday
On 03 May 2016, Simon Says Stamp e-mailed me to inform my order was shipped on 02 May 2016 and leave me with a tracking number. After a week plus, finally, the package arrived safely on my hands! I am anxious if the free birthday gift is actually Simon Says Stamp Birthday Celebration or Simon Says Stamp Magical Birthday. I know it is Simon Says Stamp Magical Birthday as it was what being carted into my cart and indeed it is.

The only additional tool I need to get now is the palette knife which I think I can use something similar to it as I am doubt if I am going to use the texture paste as often. I also need to re-visit Jennifer McGuire Ink blog on her techniques using texture paste so that I can apply some of the techniques! Yay!

Thursday, April 07, 2016

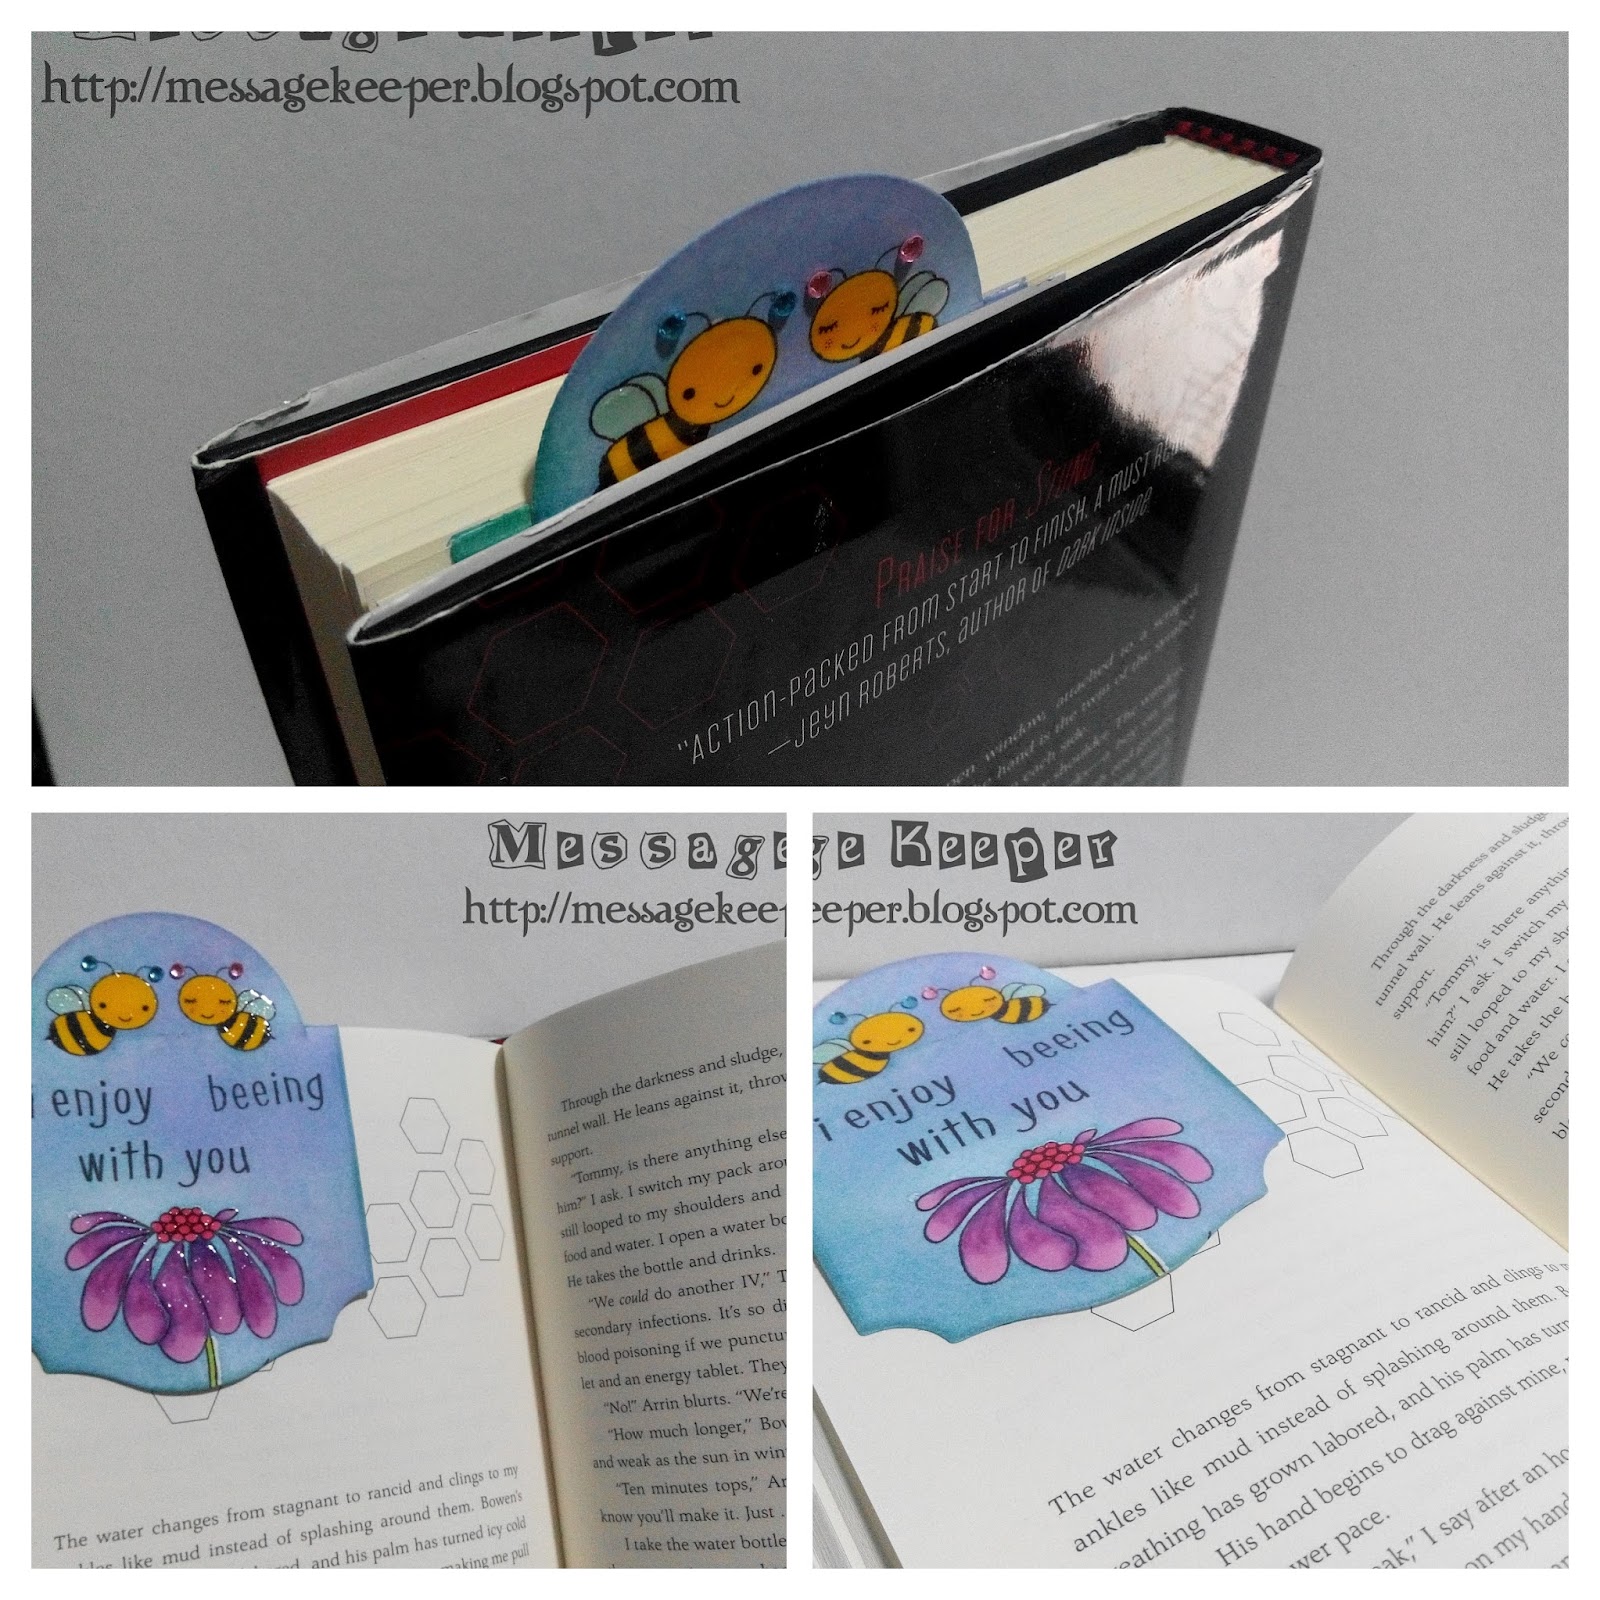
I Enjoy Beeing With You Bookmark for Stung by Bethany Wiggins

I Enjoy Beeing With You Bookmark
I kind of made a promise to myself that I would make a bookmark that corresponded to the books I am reading in this post but I never have that kind of time. :(

Left: I Enjoy Beeing With You Bookmark - Side Front View
Right: I Enjoy Beeing With You Bookmark - Side Back View
But today, I am so eager to make this bookmark as I am currently reading Stung by Bethany Wiggins and I love the story so much! As spring is in the air now in another part of the world, it is just a great idea to make a happy and fun bookmark with flower and things with wings!

Close-up: Half circle using Jennifer Mcguire's on-the-edge die cutting technique 
I wanted to try Jennifer Mcguire's on-the-edge die cutting technique which is perfect as the bookmark 'header' that pop out from the book marking where I stop my reading. Thus, first, I measure the half circle where it fits my bees placement and the shape for my bookmark. Then, I stamp the bee and flower images accordingly and colored using Copic markers.

Close-up: Modified sentiment
As for the sentiment, I want to incorporate punny wording of 'bee' as this book is after all related to bee. Thus, I modified the original sentiment of 'I Enjoy Being With You' to 'I Enjoy Beeing With You' by cutting the long sentiment apart and extra stamp the letter 'e'.

Then, I die cut the half circle using Jennifer Mcguire's on-the-edge die cutting technique follow by the shape for the bookmark. However, I realize I make a mistake as there is a impression on the half circle where the folded line is. I should instead cut the shape of the bookmark first then only cut the half circle or slit the half circle die cut in front of the shape die so that it would not leave an impression. Maybe I try that in the next bookmark that I want to make.

Close-up: Flower at the bottom of the shaped bookmark
I also would like to incorporate Jennifer Mcguire's masking alternative using glossy accents technique as I want to make the background in sky colors. Before I apply a good coat of glossy accents to the bee and flower images, I apply some sparkle to the bees' wings to give imaginary idea that they are flying. After the glossy accents dried completely, I apply good amount of inks to mimic the sky. I must admit that some of the not-meant-to-be-glossy-accents-areas are not really spot-free from glossy accents like the flower stem. But I am happy with the result as this is my first try and attempt.

This is how it looks like when inserted into the book
For the final touch, two (2) blue gems are attached to the male bees' antenna and two (2) pink gems are attached to the female bees' antenna. Finally, magnetic strips are attached to the inside of the bookmark to create a magnetic bookmark.


This card is entering the challenge(s) organized by:
1) Lawnscaping Challenge 127 - Beautiful Florals (ends by 13 April 2016)
2) MarkerPop Coloring Challenge #92 - Spring (ends by 17 April 2016)
3) Creative Card Crew - Challenge 110 - Die Cut (ends by 18 April 2016)

Stamps and tools used :
Copic marker used : B00, R20, RV25, V06, V12, V17, Y18, Y19 and YG03