Sunday, October 18, 2015

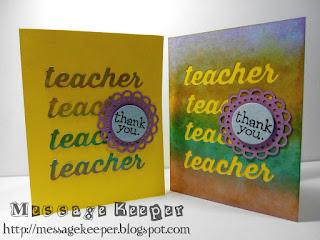
Teacher, Thank You - One Sketch Two Cards

Teacher, Thank You
I am taking a pause from my Christmas cards target by making these cards using one (1) sketch.

CAS(E) This Sketch #145
I have this idea on my mind on how to use the CAS(E) This Sketch #145 as shown above once I saw it. I thought I want to incorporate the Christmas theme cards since I am on Christmas cards target but my stash does not have what I had in mind. Thus, I have to pause from my Christmas cards target by making these cards.


Close-up: The negative 'teacher' die cut with watercolor background
First, I layer four (4) generous distress inks onto a watercolor paper and spritz some water on it. After it is dry, I die cut the 'teacher' word four (4) times onto the watercolor paper as shown in the sketch. The negative from the die cut is attached onto a yellow card base.


Close-up: The teacher die cut on the yellow card base
As for the four (4) die cut 'teacher' words, there are attached onto another yellow card base correspond to the negative teacher die cut position as in the sketch as well.


Close-up: Mini doily with sentiment
Another sentiment is stamped onto a light blue circle and attached onto a purple mini doily using foam tape. The mini doilies are then attached onto the card base as shown in the sketch.

Dimension : 11.43cm x 8.89cm or 4.5" x 3.5"
Type : Horizontal fold
Inlay : No

This card is entering the challenge(s) organized by:
1) CAS(E) This Sketch #145 (ends by 22 October 2015)

Supplies used:

Sweetest Wishes for the Happiest of Holidays - Candy Canes

Sweetest Wishes for the Happiest of Holidays - Candy Canes
Making another Christmas card for the coming holiday. I hope I have at least five (5) Christmas cards in my stash by mid November 2015.

Viva la Verve Sketches - October Week 3 Sketch
For this card, I am adopting Viva la Verve Sketches - October Week 3 Sketch as shown above. It is also inspired by Cute Cards Thursday Challenge 395 - Candy! whereby I will use candy cane.

Close-up: Candy canes
The candy cane is randomly stamped on a white stitched journal card whereby I masked the outer side and also the bottom for the sentiment. The outer side of the stitched journal card is outlined using Copic marker to give some focuses.

Close-up: Sentiment and fish tailed hanging banners
For the sentiment, another red stitched journal card is die cut and trimmed for the bottom as required size. The sentiment is stamped onto it and later layer onto the candy cane stitched journal card. Some blue fish tailed banners are attached to the bottom of the stitched journal card as shown in sketch. The stitched journal card is attached onto a light green card base using slightly smaller than the stitched journal card size foam and double sized tape.

Close-up: Holly ivy on the mini doily
Two (2) holly leaves are stamped onto a small white circle and colored using Copic markers. Three (3) red gems are used as ivy. Some faux stitching are added to the circle. The circle is layer onto a green mini doily using foam tape. The mini doily is attached onto the card as in sketch.

Close-up: Glitters on the candy canes and holly leaves
The card is finished off by applying some glitter onto the candy canes and holly leaves to give it some sparkles.

Dimension : 10.1cm x 15.2cm or 4" x 6"
Type : Horizontal fold
Inlay : No

This card is entering the challenge(s) organized by:
1) Viva la Verve Sketches - October Week 3 Sketch (ends by 05 November 2015)
2) Cute Cards Thursday Challenge 395 - Candy! (ends by 14 October 2015)

Supplies used:
Copic markers used: B00, G07 and YG17

Saturday, October 17, 2015

Be Merry Santa Tag

Be Merry Santa Tag
I think it is time to start on some Christmas projects or I will have nothing when comes to Christmas! For starter, I made this tag. :P

Tag You're It Challenge #32
This tag was inspired by the Tag You're It Challenge #32 as shown above.

I use digital stamp as I do not have any Santa Claus image in my collection. The Santa Claus image is printed and die cut into a tag, obviously since it is inspired by the Tag You're It Challenge. Then, it is colored using Copic markers.
Close-up: The Santa Claus
Another green tag is die cut and stamp with background stamp. This green tag is then layered behind the Santa Claus tag. The reasons being are one, to cover-up the bleed of the Copic markers and second, to give some special to the tag.
Close-up: Sentiment on the green fish tailed banner
For the sentiment, I stamp it onto a small fish tailed banner. Using the ring enforcer die, I die cut a hole onto the green banner so that the banner can be layered on top of the Santa Claus tag.

Close-up: Glitters on the Santa Claus' clothing and light bulbs
The tag is finished off with adding some glitter to the white areas of the Santa Claus' clothing and the light bulbs. I also try to outline the image as suggested by Kathy Racoosin on her blog here and it really makes a difference. The image is more focus and pop! Finally, a red and green checked ribbon is tied to the tag's hole.

This card is entering the challenge(s) organized by:
1) Tag You're It Challenge #32 (ends by 21 October 2015)

Supplies used:
Copic markers used: B00, B04, E21, R29, R35, R46, T7, YG13 and YR16

Wednesday, October 14, 2015

Many Thanks (Recycling Material from Previous Project)

Many Thanks
As mentioned in my previous post, I had some die cuts of stenciled pattern circles which leftover from the previous project. Today, I decided to use these leftovers before they get tucked somewhere on my desk and I forgotten about them.

Close-up: Punched border on the right side
I started off the card with some punched borders as inspired by Papertake Weekly Challenge - Two by Two whereby I will layer both left and right side with punched borders. Before I attach the punched borders to the card base, I layer a piece of pattern paper first as shown in the sketch.

Close-up: Mini doily with stenciled pattern circle and sentiment
A tag with fish tailed end is die cut and attach onto the pattern paper as shown in sketch. The mini doily circle is die cut and the leftover of stenciled pattern circles from the previous project is attached onto it. The mini doily circle is later attached onto the tag covering the tag hole.

The sentiment is stamped on a green fish tailed banner. It is attach onto the card using dimension foam to give some dimension to the card.

Dimension : 10.1cm x 15.2cm or 4" x 6"
Type : Horizontal fold
Inlay : No

This card is entering the challenge(s) organized by:
2) Papertake Weekly Challenge - Two by Two (ends by 19 October 2015)
3) Lawnscaping Challenge 115 - Sentiments (ends by 14 October 2015)

Supplies used:

Sunday, October 11, 2015

Celebrating Your Birthday

Celebrating Your Birthday
Made this birthday card for my best friend who is also my daughter godmother. She is working in Singapore and her birthday is on next Monday. I hope with one week grace period, this card will reach to her on time with a little gift I prepared earlier.

Viva la Verve Sketches - October Week 2 Sketch
For this card, I decided to play Viva la Verve Sketches - October Week 2 Sketch as shown above. I also would like to challenge myself to CAS-ual Chic, The Utterly Adorable Layers Challenge - CCC04 Tic Tac Toe'ing in which I choose stenciling, die cutting and embossing as shown below.
CAS-ual Chic, The Utterly Adorable Layers Challenge - CCC04 Tic Tac Toe'ing

Close-up: Stencil pattern
First of all, I mask a piece of white card stock with the stencil using four (4) different distress inks in random order. Then, I die cut it into a circle. Since there is still some leftover after I die cut the desire circle size I want, I go ahead to die cut the remain of the pattern into various circle sizes that fits. I will use these in the future projects. The circle is then layer onto a silver based scallop circle which later attach onto a purple card base as shown in the sketch.

Close-up: Sentiment in the tag
The sentiment is stamped onto a yellow die cut tag in pink. I fish tailed the tag to fit the card base width. Then, the tag is embossed with polka dots. Some pink twine is tied to the hole of the tag. It is later attached onto the card base as shown in the sketch using dimension foam.

As the card base is dark n color, I added a white inlay so that message can be written.

Dimension : 10.1cm x 15.2cm or 4" x 6"
Type : Horizontal fold
Inlay : Yes

This card is entering the challenge(s) organized by:
1) Viva la Verve Sketches - October Week 2 Sketch (ends by 05 November 2015)

Supplies used:

Cupcake Happy Birthday

Cupcake Happy Birthday
Made this card for my mom birthday which is tomorrow. She is coming over to my house for a short while before continuing her plan with my brother. I also plan to bake her some fresh cupcakes so that she can blow some candles with my kids, her grandchildren.

Sketch Saturday Week #382
For this card, I adopt Sketch Saturday Week #382 as shown above.

Close-up: Cupcake
The cupcake is stamped on a white scallop square and colored using Copic markers. Than, some faux stitching are added to the scallop square edge using black ink.

Close-up: Stripes panel
On a pink card base, a trimmed to size multi colors stripes pattern paper are attached onto it as shown in the sketch. Then, a multi colors dots washi tape is attached onto the panel and card base as shown in the sketch. The scallop square is attached accordingly onto the card.

Close-up: Sentiment
For the sentiment, it is stamped on a yellow scallop oval and attach onto the card using dimension foam.

Close-up: Glitters on the hearts
The card is finished by adding some blue pearls to the sentiment and colored gems to the cupcake as sprinkles. Lastly, I apply some glitter onto the hearts to make it sparkle.

Dimension : 10.1cm x 15.2cm or 4" x 6"
Type : Vertical fold
Inlay : None

This card is entering the challenge(s) organized by:
1) Sketch Saturday Week #382 (ends by 16 October 2015)

Supplies used:
Copic markers used: E11, E13, R29, RV13, RV14, Y11 and YG03