Sunday, June 26, 2016

Fountain Birdy Thanks for Your Purchase

Fountain Birdy Thanks for Your Purchase
This is my second card for the day in which I made it for another of my returning Copic markers buyers as well. I am really thankful for his support!

CAS(E) This Sketch #178
I am adopting the sketch from CAS(E) This Sketch #178 as shown above but forgotten to link-up to the challenge InLinkz. :(

As the sketch is simple and concentrated on the right bottom corner, I decided to have an all-in-one image and sentiment! First, the postage is die cut using white card stock to get the inside of the postage where the image will be. Then, the postage is die cut again using green card stock for its postage border.

Close-up: The image and sentiment
The fountain and the bird are stamped and colored using Copic markers. I been having this Lawn Fawn Gnome Sweet Gnome stamp set for a while but the fountain and the bird are never inked before. What a shame! But today, I get to play with them and I love it very much! I do some blue highlight to the images so that it is more stand out.

Close-up: Sentiment, both die cut and stamped
On the bottom of the postage border, the sentiment 'For Your Purchase' is stamped. Then, I die cut the word 'Thanks' onto some pattern paper.

For the assembly, the postage border is first attached onto the blue card base. Then, follow by the image using foam tape. Finally, the die cut word 'Thanks' onto the image.

Dimension: 10.1cm x 15.2cm or 4" x 6"
Type: Vertical fold
Inlay: None

This card is entering the challenge(s) organized by:
2) Addicted to CAS - Challenge #91 - Fly (ends by 08 July 2016)

Supplies used:
Copic markers used: BG01, E31, E33, N1, N3 and N4

Butterfly Just Wanted to Say Thank You for Your Purchase

Butterfly Just Wanted to Say Thank You for Your Purchase
Made this card for another of my first time Copic markers buyers who uses Copic markers in her arts. I would say as a first timer ordering with me, she is generous on her order as she bought a lot in one order.

Retrosketches #219
I am adopting the sketch from Retrosketches #219 as shown above which is perfect for Tag You're It Challenge #50 too as shown below. Somehow, I did not realize that Retrosketches #219 already over until I almost finished my card. :( Thus, I am playing with Retrosketches #219 sketch without entering the challenge.
Tag You're It Challenge #50

Close-up: The tags
First, a white tag is die cut follow by the pattern paper tag. On the white tag, the flower is stamped at the bottom of the tag and colored using Copic markers. The white area above the flower is distressed using distress ink to mimic sky. The butterfly is stamped and colored using Copic markers as well before it is die cut using matching dies. Both of the tags are attached together with the pattern paper tag behind the flower tag. Then, the butterfly is attach onto the flower tag using dimension tape. Some white and red twine is tied to the tag.

Close-up: The sentiment
On a yellow card base, a washi tape with white dots and red background is layered across the card base as in sketch. Then, the sentiment is stamped onto the top corner as in sketch. The words 'Thank You' is colored using Copic marker.

Close-up: The shimmer on the butterfly wings
The tags are attached to the card base as in sketch. As final touch, some shimmers are added to the wings of the butterfly as well as the 'Thank You' wording.

Dimension: 10.1cm x 15.2cm or 4" x 6"
Type: Vertical fold
Inlay: None

This card is entering the challenge(s) organized by:
1) Tag You're It Challenge #50 (ends by 6 July 2016)
2) Addicted to CAS - Challenge #91 - Fly (ends by 08 July 2016)

Supplies used:
Copic markers used: BG05, BG09, RV17, RV25, RV29, V17 and Y13

Sunday, June 12, 2016

Butterfly Thinking of You Now & Always

Butterfly Thinking of You Now & Always
Just made this card for fun and de-stress myself a bit. Furthermore, I found some challenges that are good and interest me to play with! ;p

Close-up: Faux messy watercolor background
First, I made a faux messy watercolor background on a white rectangular card stock using my new stamp I bought in early 2015 but yet to get it inky. Then, a pink-green plaid patter paper is trimmed and attache onto a neon pink card base follow by the faux messy watercolor background as in sketch.

Close-up: The butterfly
The butterfly is stamped on a white card stock and colored using Copic markers. It is then die cut using its matching dies. Before it is layer onto the green scallop square using dimension foam, a light blue liner is being applied so that the butterfly image is more focus. The green scallop square is later attached onto the messy watercolor background using dimension foam as well.

Close-up: The sentiment
On a green strip, the sentiment is stamped and attached onto the card base as in sketch. The angle of the sentiment is purposely off angle to emphasis on the off kilter effect. The excess from the strip is trimmed.

Close-up: Shimmer on the butterfly cells
As final touch, some shimmers are added to the cells of the butterfly, both its upper and lower wings.

Dimension: 10.1cm x 15.2cm or 4" x 6"
Type: Vertical fold
Inlay: None

This card is entering the challenge(s) organized by:
2) Lawnscaping Challenge 131 - Off Kilter! (ends by 15 June 2016)

Supplies used:
Copic markers used: B04, BV02, RV25, YG13 and YR15

Sunday, June 05, 2016

Lots of Hearts Wedding Congratulations

Lots of Hearts Wedding Congratulations
Made this card for one of my husband biker buddy who is having his wedding and dinner reception at Avillion Port Dickson. Initially only my husband will attend but after some confirmation and all, we decided to go as family. We also would like to take the opportunity to take the kids to the beach as promised.

Fusion Card Challenge - Something Blue
I am adopting the both the photo inspiration and sketch from Fusion Card Challenge - Something Blue as shown above even the challenge date has been past due. The photo just remind me of wedding cake.

Close-up: The groom and bride representative hearts
First, I stamp the hearts onto a trimmed white card stock and emboss them in gold embossing powder. Then, the background is distressed while leaving the hearts blank. The heart on the left is colored with blue to represent groom while the heart on the right colored in red to represent bride. I am using distress colors to color these hearts.

A washi tape that have red hearts pattern is attached onto a card yellow base as shown in the sketch follow by an alternate pink and red border sticker. The hearts background is then attach onto these strips using dimensional foam as shown in the sketch.

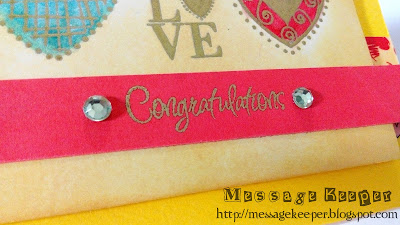
Close-up: Sentiment in embossed gold
The sentiment is stamped on a red strip and emboss using gold embossing powder as well. The strip is fish-tailed at the right end and layered onto the background as in sketch.

Close-up: Shimmers on the hearts
As final touch, some shimmers are added to the hearts as they are the main focus. Two (2) gems are added to the beginning and ending of the sentiment.

Dimension : 21.5cm x 10cm or 8.5" x 4"
Type : Top fold
Inlay : None

This card is entering the challenge(s) organized by:

Supplies used: