Showing posts with label Congratulations. Show all posts

Sunday, April 24, 2022

Tulip Congrats

Tulip Congrats
Made these congratulations cards for my manager and segment lead who won the AP level recognition recently. I am so proud of them.

Freshly Made Sketch #532 - A Sketch by Kim
I am adopting the sketch from Freshly Made Sketch #532 - A Sketch by Kim. Both the cards will be the same sketch except for the tulip where the colors are changed. and yes, I am into Fusion Card Challenge - Tulips as well where I was inspired by the tulip photo where coincidentally I just bought the Pretty Pink Posh Tulips stamp set recently.
Close-up: The tulip in purple and glitter
The tulips are stamped on the white card stock and colored using Copic markers. They are die-cut using the matching dies. Two (2) more pieces of the matching dies are die-cut from white card stock to be a layer at the bottom to create dimension.

Close-up: Dark purple background
For the panel, a slimline background dies is used to die-cut the dark purple card stock and divided equally in length. They are attached to a cream card base as in the sketch followed by the die-cut tulip.

Close-up: Die-cut sentiment
The sentiment is die-cut onto white and yellow card stocks twice. They are then stacked together to create dimension with the yellow die-cut sentiment on the top layer. The die-cut sentiments are attached to the dark purple background panel.

Close-up: The tulip in red and glitter
The card is finished by adding some glitter onto the tulip itself to make it sparkle and shine. Some pink gems are added to the top and bottom edge of the dark purple background panel as well.

This card is entering the challenge(s) organized by:
2) Fusion Card Challenge - Tulips (ends by 25 April 2022)

Supplies used:
Stamps used:
1) Pretty Pink Posh Tulips

Dies used:
1) Unbranded Congrats
2) Unbranded Slimline Frames and Background

Saturday, March 25, 2017

Birdies Wedding Congrats

Birdies Wedding Congrats
Made this card for my colleague engineer who is having his wedding dinner reception tomorrow night.


Tuesday Morning Sketches #395
For this card, I am adopting the sketch from Tuesday Morning Sketches #395 as shown above.

I decided to use these cute and adorable birds images as they mimic the couple where both of them are wearing glasses as well. All the images are stamped onto a white card stock and colored with Copic markers. Then, they are die cut using matching dies. On a white parchment paper texture card base, pattern paper with varieties of heart shapes and colors is attach onto it.


Close-up: Images on the stitched journaling card
On a pink embossed stitched journaling card die cut, the sentiment is stamped on the right bottom. Then, the images are attached onto it using dimension tape. A red/white twine is used to tie the tree trunk and the birdhouse. The whole stitched journaling card is then attached onto the card base using double sided tape.


Close-up: The shimmer on the hearts and glasses and the coat of glossy accents on the glasses
Finally, a red heart gem and some pink and red circle gems are attached to the upper left and right lower side of the stitched journaling card as in sketch. Some shimmer is added to the glasses of the birdies follow by a coat of glossy accent to make it more realistic. Some shimmer is applied to the hearts as well.

Dimension : 4.25" x 5.5" or 10.8cm x 13.9cm
Type : Top fold
Inlay : None

This card is entering the challenge(s) organized by:
1) Tuesday Morning Sketches #395 (ends by 26 March 2017)
2) Brown Sugar Challenge #243 - Anything Goes (ends by 30 March 2017)

Supplies used:
Copic markers used: B24, B28, B32, E31, E55, E59, R29, RV23, RV25, RV29, Y13, Y19 and Y21

Sunday, January 15, 2017

Congratulations on Your New House

Congratulations on Your New House
Made this card for my husband biker member who is hosting a housewarming tomorrow.

CAS(E) This Sketch #204
I adopt the sketch from CAS(E) This Sketch #204 as shown above. However, I flipped the sketch 180 degree so that it fit my image.

The house image is stamped onto a white card stock and colored using Copic markers. Then, the background is blended with inks; bottom with green to mimic the grass and upper with blue to mimic the sky. The panel is attached onto a green card base.
Close-up: The house
The sentiment is stamped onto a green strip (same color as the card base) and attached onto the house image as in sketch.

Close-up: The glossy window glasses
For finishing touch, I added some white pearls above the chimney mimicking smokes coming out from it. I also apply a layer of shimmer and a coat of glossy accent to the window glasses to make them shine and glass lookalike!

This card is entering the challenge(s) organized by:
1) CAS(E) This Sketch #204 (ends by 19 January 2017)
2) Brown Sugar Challenge #233 - Anything Goes (ends by 19 January 2017)

Supplies used:
Copic marker used: B00, BV17, E31, E33, E37, E50, E59, R24, R29, R39, V01 and YR23

Saturday, July 23, 2016

Nurse Congrats

Nurse Congrats
Made this card for my childhood best friend who is an Advanced Practice Nurse (APN) in Singapore National University Hospital (NUS) in which she received Ministry of Health Singapore Nurses Merit Award 2016 on 19 July 2016. I am so proud of her on her achievement despite that she is dyslexia.

MFT Wednesday Sketch Challenge - Sketch 290 (MFTWSC290)
For this card, I am adopting MFT Wednesday Sketch Challenge - Sketch 290 (MFTWSC290) as shown above but rotated it clockwise to fit my image.

Close-up: Modified nurse image
The image I use suppose to be a female doctor but I turn her into nurse in which I stamped on a white stitching journal card die cut. It is colored using Copic markers by matching my best friend nurse uniform color. The stethoscope is colored with glitter pen to give some bling to it.

A washi tape that have red hearts pattern is attached onto a card yellow base as shown in the sketch follow by a pink fishtailed banner. The stitching journal card die cut is attached on top of it as in sketch.

Close-up: Sentiment
The sentiment is stamped on a green strip and fishtailed at both the ends. It is attached onto the card as shown in sketch using foam tape.

Finally, two (2) gems are added to the front and end of the sentiment. A grey pearl heart is attached to the hair as illustrated and another pink pearl heart is attached onto the medical record that the nurse is holding.

This card is entering the challenge(s) organized by:

Supplies used:
Copic markers used: B00, B06, BG09, E51, T7, Y21 and YR00

Sunday, June 05, 2016

Lots of Hearts Wedding Congratulations

Lots of Hearts Wedding Congratulations
Made this card for one of my husband biker buddy who is having his wedding and dinner reception at Avillion Port Dickson. Initially only my husband will attend but after some confirmation and all, we decided to go as family. We also would like to take the opportunity to take the kids to the beach as promised.

Fusion Card Challenge - Something Blue
I am adopting the both the photo inspiration and sketch from Fusion Card Challenge - Something Blue as shown above even the challenge date has been past due. The photo just remind me of wedding cake.

Close-up: The groom and bride representative hearts
First, I stamp the hearts onto a trimmed white card stock and emboss them in gold embossing powder. Then, the background is distressed while leaving the hearts blank. The heart on the left is colored with blue to represent groom while the heart on the right colored in red to represent bride. I am using distress colors to color these hearts.

A washi tape that have red hearts pattern is attached onto a card yellow base as shown in the sketch follow by an alternate pink and red border sticker. The hearts background is then attach onto these strips using dimensional foam as shown in the sketch.

Close-up: Sentiment in embossed gold
The sentiment is stamped on a red strip and emboss using gold embossing powder as well. The strip is fish-tailed at the right end and layered onto the background as in sketch.

Close-up: Shimmers on the hearts
As final touch, some shimmers are added to the hearts as they are the main focus. Two (2) gems are added to the beginning and ending of the sentiment.

Dimension : 21.5cm x 10cm or 8.5" x 4"
Type : Top fold
Inlay : None

This card is entering the challenge(s) organized by:

Supplies used:

Saturday, May 28, 2016

Monkey Couple Congratulations on Your Wonderful News

Monkey Couple Congratulations on Your Wonderful News
Made this wedding congratulations card for my two (2) Malay colleagues who are tying the knot today. They are so secretive about their relationship that I did not realize until I received the wedding invitation! The news really shocked and surprised me but I wish them well. :)

Close-up: The monkey couple
First, the monkey couple image is stamped on a white circle die cut along with the tree trunk. Then, they are colored with Copic markers. I also outline the monkey couple as suggested by Kathy Racoosin on her blog here as I want to make the monkey couple more focus. I tone down the background with a shade lighter blue Copic marker to mimic the jungle. The leaves are stamped surrounding the monkey couple to give more jungle illusion.
On a yellow card base, a green pattern paper is attache onto it as in sketch follow by the pink hearts red background pattern paper strip. Then, the circle image is attached onto the card base as in sketch.

Close-up: Sentiment
The sentiment is stamped on a green frame die cut and attached onto the card base as in sketch. As final touch, some shimmer are added to the monkey couple and I might overdone a little. :P Then, four (4) yellow gems are attached to the corner of the frame.

Dimension: 12.7cm x 19cm or 5" x 7.5"
Type: Top fold
Inlay: None

This card is entering the challenge(s) organized by:

Supplies used:
Copic markers used: B00, BG01, E11, E13, E21, E23, E35, E37, E55, E57 and YG17

Monday, March 07, 2016

Birdies Wedding Congratulations

Birdies Wedding Congratulations
Made this wedding wishes card for an ex Malay colleague who is getting married this Saturday. Her wedding reception is in Penang and I could not make it. Thus, I made her this card which I pass to another colleague who is going.


Close-up: The tag, birdies, sentiment and embellishment
The birdies are stamped, colored using Copic markers and die cut using the matching dies. On a pink card base, a border is made using washi tape that have hearts pattern which is just perfect for the occasion.


The wedding invitation
A doily is layered onto the center of the card base as in sketch. The use of doily is inspired by the wedding invitation itself as shown above.

A yellow tag is die cut and tied with a red ribbon. It is layered onto the doily as in sketch using dimensional tape. The birdies are layered onto the tag using dimensional tape as well.


Close-up: Gold embossed sentiment
The sentiment is stamped on a neon pink strip and emboss using gold embossing powder. The strip is fish-tailed at two (2) ends and layered onto the yellow tag using dimensional tape.


Close-up: Shimmer on the birdies' glasses
Finally, some red heart shaped pearls follow by a bigger red heart gem are attached above the birdies to mimic they are in love. Some shimmer is added to the glasses of the birdies.

Dimension : 10.16cm x 15.24cm or 4" x 6"
Type : Top fold
Inlay : None

This card is entering the challenge(s) organized by:
1) Sketch Saturday Week #402 (ends by 11 March 2016)
2) AAA Cards - Game #59 Embossing (ends by 12 March 2016)
3) Catch the Bug Challenge Blog - March - Anything Goes (ends by 12 March 2016)

Supplies used:
Copic markers used: B02, B04, BG01, RV14, RV17, RV23 and Y35


Tuesday, November 10, 2015

Elephants Wedding Wishes

Elephants Wedding Wishes
Made this wedding wishes card for an ex primary schoolmate who is getting married this Saturday.

Viva la Verve Sketches - November Week 1 Sketch

Close-up: Chinese wedding related pattern paper and stripe banner
Pattern paper with 'double happiness' in Chinese character, '喜喜' and Chinese wedding related images is used as the overlay of the background. Then a stripe banner is die cut and attached onto the pattern paper background as in the sketch. A silver ribbon with hearts 'hanging' on the sides are attached onto the earlier two (2) items as shown in the sketch. I did tie a bow as it is hard to tie a bow using this ribbon due to its 'hanging' hearts on the sides. The whole panel is attached onto a red card base using dimensional foam and double sided tape.

Close-up: The female elephant (cow) and male elephant (bull)
The elephants are stamped onto a white card stock and colored using Copic markers. I did not use the elephant natural colors as I like to differentiate the male elephant (bull) and female elephant (cow) literally. Then, they are die cut using the matching dies.

A stitched journal is die cut onto a light pink card stock which will act as the base for the elephants to 'sit' on as shown in the sketch. The sentiment is stamped on center top of the journal card and embossed in gold.
Close-up: Sentiment embossed in gold
The elephants are arrange accordingly below the sentiment and attached onto the journal card using dimensional foam tape. Some hearts flying out above the elephants are stamped onto the journal card to represent that these elephants are in love or is a pair of couple. Finally, the journal card is attach onto the card base as shown in the sketch.

Dimension : 12.7cm x 19cm or 5" x 7.5"
Type : Vertical fold
Inlay : None

This card is entering the challenge(s) organized by:
2) Just Us Girls JUGS - Word Week #318 - Stripes (ends by 12 November 2015)

Supplies used:
Copic markers used: B02, B04, B06, R81, R83 and R85

Monday, May 26, 2014

Balloon and Party Bird Congratulations!

Balloon and Party Bird Congratulations!
Made this card for my new manager who promoted to replace my previous manager. He is officially my boss now.

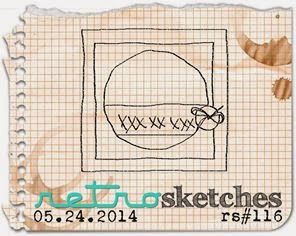
Retrosketches #116
I adopt the sketch from Retrosketches #116 as shown above.

Close-up : Custom balloons background
As it is a congratulations and celebration card, I adopt balloon as my background theme. I created a balloon background by stamping the balloon randomly on a yellow card stock and colored with Copic markers. Then, I die cut the center of the card using scallop square.

Close-up : Party bird
On a white card stock, the party bird is stamped and colored using Copic markers. It is then attached onto a blue card base. The balloon background is attached on top of the party bird using pop dots.

Close-up : Sentiment in the banner
A banner with sentiment is stamped on a light blue card stock and die cut using matching dies. It is attached onto the balloon background as in sketch.

Dimension : 13.97cm x 13.97cm or 5.5" x 5.5"
Type : Vertical fold
Inlay : None

If you would like to have a similar design of these items or individual item, please fill up the custom order form here. Please do include the color or theme you prefer, purpose of the item(s) (farewell, retirement, birthday and etc) and message (if any).

This card is entering the challenge(s) organized by :
1) Retrosketches #116 (ends on 30 May 2014)
5) Crazy for CAS - Challenge #45 Balloons (ends on 06 June 2014)

Stamps and tools used :