Friday, December 23, 2016

Christmas Gifts from Myself (or Hubby) and Kimmy!

First row from left to right:
Fancy paper bag with closure
Gable box
Second row from left to right:

six (6) pieces pierced jar label stackable dies
Rectangle box
There is a seller/crafter by the name of Kimmy Yu who sells these unbranded and economic dies in Facebook Malaysia craft related groups. Sometimes she sells branded stamp sets as well. I noticed her posting for a while but never really take a closer look. In her post, she mentioned that the dies are brand new and with normal plastic packaging only and even warn buyers if they mind, please do not order. Then, one day in late November 2016, I decided to take a closer look at her posting and to my surprise, the dies she sells are really economical! Imagine that I can get four (4) sets of dies in about RM150! I told my hubby (my finance minister) about it and he give me permission to buy those dies I been dying for! Hooray!!!

Fancy paper bag with closure
I sent Kimmy the screenshots of dies I want but I forgot to include the written message as I was busy with something else after I sent the screenshots. After a while, she replied that all the dies I want are still available. Upon receiving her message, then only I realize that I forgotten to include the written message but yet she replied me. I proceed to ask about the total including postage fees and confirm on the postage method. She replied me on the total amount, confirmation on postage method as well as her account details. Since I had a planned vacation the following week, I told her to reserve the items for me and I will made the payment after I am back from my vacation. She noted.


Gable box which similar to Papertrey Ink (PTI) Gable Box Die in size and design
However, I forgotten about the deal as I am busy with works after came back from vacation. I only remember the deal in the week of Christmas and quickly message Kimmy to apologize and ask if the items are still available. She asked me to re-send the photos and included a link to her still available on sale items album. I re-sent the photos and she reverted the same total amount, her account details and a short instructions for after payment follow-up details. I re-confirm again on the postage method as I told her that I wish to receive the items by Friday if I made my payment that night. She informs that Kuala Lumpur areas will receive the items the next following day after she posted. I share with her my concern on the manpower limitation of courier company due to it is near to festive holiday season as well as year end which might delayed the delivery. Nevertheless, I inform that I will inform her once I made my payment and she noted.


Six (6) pieces pierced jar label stackable dies
Later that night, I made the payment and message her to acknowledge her on the payment. As I was typing my delivery address and details, she messaged to ask for the same. Once I sent the details over, she acknowledged and inform that she will let me know once she posted the items. I re-confirm with her again if the dies she is selling really unbranded and where they come from. She replied she is unsure as her supplier did not share with her these details.


Rectangle box which similar to Papertrey Ink Vintage Favor It Box Die in size and design
As for the dies, I chosen these:
1) Fancy paper bag with closure which I never see one before in all the crafting products companies I known or follow so far
2) Gable box which similar to Papertrey Ink (PTI) Gable Box Die in size and design but way economical, roughly 40% of Papertrey Ink (PTI) Gable Box Die price
3) Six (6) pieces pierced jar label stackable dies which I never see one before in all the crafting products companies I known or follow so far. Largest label size is 4.6" and with quarter inch decreament where the smallest label size is 1.6" 
4) Rectangle box which similar to Papertrey Ink Vintage Favor It Box Die in size and design but minus the zipper dies and more economical, roughly 45% of Papertrey Ink Vintage Favor It Box Die price

The next day, Kimmy sent me a photo of consignment slip which means that she already posted my items. I thank her. The following day, I received my parcel at about lunch time. After checking the items, I message Kimmy to inform her and thank her for the free gift. Yes, she included a free gift that worth RM15! I praise her kindness to include a free gift and wishes her Merry Christmas and Happy New Year.


Free gift from Kimmy, a leafy border
I am so happy that the items arrived before Christmas holiday as if there is any delay, it means that my parcel will have to overnight at the courier company warehouse for few days due to public holidays and at risk being lost in transition. As the items arrived before Christmas, these items are my early Christmas gifts from myself (or my beloved hubby since he gave me permission to spend) and Kimmy as well for the free gift she included. 

I hope I can play with these dies soon and test its quality. If the quality is good, then I might find myself an economic way to buy more dies! *big big grin* 

Saturday, December 17, 2016

Embossed Background Wedding Card and Tag

Embossed Background Wedding Card and Tag
Made this card and little tag for my cousin sister who is having her dinner reception for Malaysia relatives and friends tomorrow. She is married to Singaporean and had their church wedding and luncheon reception in Singapore last week. The card will be passed to her while the little tag will be inserted into the money angpau to indicate the angpau is from who.

I started off with arranging the heart images and 'love' wordings onto the acrylic block. Then, they are stamped onto watercolor paper and embossed using gold embossing powder. The same process is repeated with white embossing powder for the tag. Colors (inspiration from the wedding card invitation) are added to the embossed background.

Embossed Background Wedding Card
For the card, the sentiment is stamped onto an orange card stock and embossed using gold embossing powder. The gold embossed background is trimmed accordingly to fit the bottom and upper of the sentiment. They are layered onto the orange sentiment card stock using foam tape. Then, the whole panel is attached onto a yellow card base.
Close-up: The gold embossed sentiment on the wedding card

Embossed Background Wedding Tag
While for the tag, the sentiment is stamped onto a pink parchment stitched tag die cut using gold ink. The white embossed background is first die cut with stitched tag dies. Then, it is trimmed accordingly to fit the bottom and upper of the sentiment and layered onto the pink parchment stitched tag. Another white stitched tag is attached to the back of the pink parchment stitched tag for message writing.
Close-up: The gold embossed sentiment on the wedding tag

For finishing touch, I apply a layer of shimmer to both of the backgrounds to make them shine; after all, it is a wedding wishes card!

This card is entering the challenge(s) organized by:
2) Little Miss Muffet Challenge #153 - Anything Goes (ends by 29 December 2016) 

Supplies used:

Saturday, October 22, 2016

One Layer Stenciled Thank You for All That You Do!

One Layer Stenciled Thank You for All That You Do!
This is the second project of the day and I am continuing my hand-made cards for some of my associates that helped me in my recent case and situation. I been chasing them like crazy people for last few days of my case dateline and I am sure a lot pressures are on their shoulder. Thus, I hope these cards will show them how much I really appreciate their helps, urgent and priority on my case.

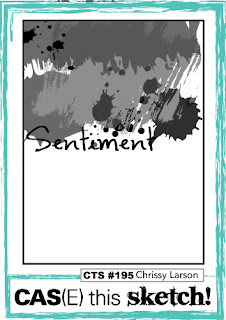
CAS(E) This Sketch #195
For these cards, I am adopting CAS(E) This Sketch #195 as shown above. For the second card, I am top mirroring the original sketch. I decided to make a simple and one layer card as the target receivers are male.

Close-up: One Layer Stenciled Thank You for All That You Do! - original sketch
On the white card base, three (3) distress colors are apply onto the stencil on the bottom and top half of the card base.
Close-up: One Layer Stenciled Thank You for All That You Do! - top mirror sketch
Close-up: Sentiment on the original sketch
Then, the sentiment is stamped accordingly as in sketch.
Close-up: Sentiment on the top mirror sketch

One Layer Stenciled Thank You for All That You Do! card and matching envelope
I also made matching envelopes for these cards by stenciling the same design onto the envelope flap but only using one distress color instead of the three (3) distress colors. Just a little something to make the blank envelope more interesting. :P

Dimension : A2 card or 4.25" x 5.5"
Type : Top fold
Inlay : None

This card is entering the challenge(s) organized by :
1) CAS(E) This Sketch #195 (ends by 27 October 2016)
2) Brown Sugar Challenge #221 - Anything Goes (ends by 27 October 2016)
4) Little Miss Muffet Challenge #149 - Anything Goes (ends by 02 November 2016) 

Supplies used:

3D Rose Just Wanted to Say Thank You for All Your Help

3D Rose Just Wanted to Say Thank You for All Your Help
Made these cards for some of my associates that helped me in my recent case and situation. I been chasing them like crazy people for last few days of my case dateline and I am sure a lot pressures are on their shoulder. Thus, I hope these cards will show them how much I really appreciate their helps, urgent and priority on my case.


Viva la Verve Sketches - October Sketch 2
For this card, I am adopting Viva la Verve Sketches - October Sketch 2 as shown above. Nowadays, I am saving up some time by making two (2) cards using one (1) sketch either by mirroring or rotating the sketch. By doing so, I really can share more times as well as built up my cards stash!


Close-up: 3D Rose Just Wanted to Say Thank You for All Your Help - original sketch
I decided to make my signature 3D flower for this card. I stamp flower image three (3) times and colored them in Copic markers. One of them is die cut using the matching die while the other two (2) are trimmed accordingly to the portion I need. The leaves are stamped on a green card stock using green ink and die cut.


Close-up: 3D Rose Just Wanted to Say Thank You for All Your Help - 180 degree rotated sketch
On a trimmed vellum, I did some dry embossing. This is my first attempt of using vellum in dry embossing and it turned out well! The embossed vellum is then attach onto a yellow card base as in sketch.


Close-up: Sentiment in fishtailed banner
On an orange card stock, the sentiment is stamped and fishtailed on both ends. It is attached onto the card base, one on the bottom and another one on top.


Close-up: 3D rose with shimmer
Then, the base of the flower that die cut with matching die and leaves are assemble and attach onto the card base as in sketch. The 3D flower is then built upon it using foam tape.

As final touch, I add some shimmer onto the flower and fill the 'Thank You' sentiment space to make it all shine and nice! Two (2) white pearls are also added to the start and end of the sentiment sentence.


3D Rose Just Wanted to Say Thank You for All Your Help card and matching envelope
I also made matching envelopes for these cards by stamping the similar flower and leaves onto the envelope flap. This is my first time made a matching envelope and I just love it!


Dimension : A2 card or 4.25" x 5.5"
Type : Vertical fold
Inlay : None

This card is entering the challenge(s) organized by :
1) Viva la Verve Sketches - October Sketch 2 (ends by 03 November 2016)
3) Brown Sugar Challenge #221 - Anything Goes (ends by 27 October 2016)
5) Little Miss Muffet Challenge #149 - Anything Goes (ends by 02 November 2016) 

Supplies used:
Copic marker used: R20, R29, R35 and YG03

Tuesday, October 11, 2016

Gate-Folded Thank You Mini Cards


Gate-Folded Thank You Mini Cards
Made this mini card for one of my returning Copic markers buyers. I am really appreciate for his support on my mini business!

Sketch Saturday Week #433
For this card, I am adopting Sketch Saturday Week #433 as shown above. This sketch has prompted me to make a gate-folded card which is just perfect for few challenges that call for fancy or many fold cards!

As I decided to make gate-folded mini card, the space is really limited. Thus, I opt for die cut sentiment which prompt me to make two (2) cards using both the negative and positive die cut. I only need one card but I can keep  another one for later use. 


Gate-Folded Thank You Mini Cards - mirror sketch version using negative die
First, I die cut circles from metallic card stock that have mirror effect as well from green sticker. The metallic circles will be the base in which I layer both the negative and positive die cut onto it. The 'Thank You' sentiment is die cut onto the green sticker circles. The sticker elements really helps to adhere things faster and nicely onto the metallic circles.

On a pale yellow card bases, I die cut the 'gate' to make a nice gate edges. Then, the metallic circles are adhere onto the gate as in sketch, one to the left and another to the right. One card will follow the sketch exactly and another one will be mirror of it, thus the left and right.


Gate-Folded Thank You Mini Cards - original sketch version using positive die
For little embellishment and to help the gate-folded card stay closed, I stamp two (2) birds that have one look to the front and another look to the right direction. They are colored using Copic markers and I added some pattern to their scarf using silver glitter pen, dots for the bird look to the front and stripes for the bird looking to the right. Then, they are die cut using the matching die and adhere to the card base as in sketch using dimensional dots. The birds are placed just nice to make a simple snap to hold the metallic circles in close mode.

Inside the card bases, a blue trimmed card stock is layered onto them. I also die cut another two (2) white circles to attach on top of the blue layer that coordinate its position with the metallic circles. The white circles will be like hidden message space behind the metallic circles.

Dimension : 3" x 3"
Type : Gate fold
Inlay : Yes

This card is entering the challenge(s) organized by :
1) Sketch Saturday Week #433 (ends by 15 October 2016)

Supplies used:
Copic marker used: BG05, R24 and Y19

Saturday, September 24, 2016

Wish Big Monster Shaker Card

Wish Big Monster Shaker Card
Made this card for my best friend whose birthday is coming next month. But since she is in Singapore, I need to get the present and this card posted early so that it will arrive on time for her birthday.

MFT Wednesday Sketch Challenge - Sketch 299 (MFTWSC299)
For this card, I am adopting MFT Wednesday Sketch Challenge - Sketch 299 (MFTWSC299) as shown above and it is just perfect for challenge hosted by CAS-ual Fridays CFC157 - Shaker Card. I must admit that those confetti inside the shaker shape just remind me of party as challenge hosted by Cute Cards Thursday Challenge 444 - Party Time!

Close-up: The shaker circle
First, I die cut a white circle as the shaker base and also to stamp my image on. Then, I die cut a same size circle of acetate. Using a smaller circle die with the circle die I used to die cut the shaker base, I create a frame out of both circle dies so that I will have a rim/ring to build the shaker depth by die cutting from foam. In fact, I die cut two foam rim/ring so that I have the depth I needed. I also die cut a gold rim/ring to be attached at the most top layer of the shaker as decorative rim/ring to cover up every else (mostly ugly things) behind it. By this time, I did wish that I have Lawn Fawn Stitched Frame as die cut the frame by pairing two (2) sizes of circle dies together really do have its challenge.

Close-up: The sentiment and monster
The next thing I do is stamp the monster image and sentiment onto the white circle shaker base and color the monster with Copic markers. After coloring the monster, I give her some uniqueness by adding some mini spots under its horns as well as her webbed feet. With those mini spots, she just look different! More shimmer is added to her body as it is after all a birthday celebration and for me, needs lots of shine. :P
Close-up: Shinning monster (photo taken before the shaker is assemble)

Wish Big Monster Shaker Card - after it was shake
Then, it is time to assemble the shaker together. I use double sided tape as my medium instead of liquid glue as it is more manageable with double sided tape but it took some times as I need to peel shorter length of the tape due to the curvy of circle. I use some glitter confetti and gold steel ball bead nail art decoration as shaker elements.

Close-up: The panel - recycling from another project
As for the panel, I re-use leftover of masked stencil piece from this card. After the masked stencil piece is trimmed to size, it is attached onto a green card base as in sketch follow by the the shaker circle.

Dimension : A2 card or 4.25" x 5.5"
Type : Vertical fold
Inlay : None

This card is entering the challenge(s) organized by :
2) CAS-ual Fridays CFC157 - Shaker Card (ends by 04 October 2016)
3) Cute Cards Thursday Challenge 444 - Party Time! (ends by 28 September 2016)
4) Brown Sugar Challenge #217 - Anything Goes (ends by 29 September 2016)

Supplies used:
Copic marker used: R20, YG03, YG13 and YG17

Saturday, September 17, 2016

Happy Retirement Flower Girl

Happy Retirement Flower Girl
Making this card for my daughter's Morale teacher who is retiring next week.

I am making a mini card, size of a gift card as I plan to put this card inside a gift bag with a small present. Thus, I keep this card clean and simple due to its limited size.

Close-up: The girl holding the bunch of flowers
First, a girl holding a bunch of flowers image is stamped on a white card stock and colored using Copic markers. Then, it is attached onto a red-pink plaid pattern paper.

Close-up: Sentiment on vellum
The sentiment is customized using alphabet stamp and stamped onto a vellum. It is attached onto the girl image at the bottom. Then, the whole panel is attached onto a green card base.

Close-up: Shimmer of the flowers and pink flower shaped gem
As final touch, some shimmer is added to the flowers and a pink flower shaped gem is attached onto the girl head.

Dimension : Gift card or 3.25" x 2.25"
Type : Vertical fold
Inlay : None

This card is entering the challenge(s) organized by :

Supplies used:
Copic marker used: C5, C6, BG01, BG05, BG45, BV11, BV13, E11, E51, R02, RV14, YR16 and V15

Wednesday, September 14, 2016

Happy Birthday Cake with Flower Frame

Happy Birthday Cake with Flower Frame
My birthday cards are running low in stocks. Thus, I am making birthday card today hoping to replenish.

Tuesday Morning Sketches #369
For this birthday card, I am adopting Tuesday Morning Sketches #369 as shown above. I also adopting Deep Ocean Challenge - Challenge #137 - Bingo as shown below where I chosen pearls, flowers and lace.
Deep Ocean Challenge - Challenge #137 - Bingo

Close-up: Happy birthday cake tag with flower frame 
On a white tag, the birthday cake with sentiment is stamped and colored using Copic markers. The stitched frame is die cut onto a flower pattern paper and layer onto the white tag.

A string of lace is attached onto a yellow strip which then attached onto an orange card base using foam tape. The white tag is attached onto the card base using double foam tape as shown in the sketch.

Close-up: Shimmer and pearls on the cake
As final touch, some shimmers and four (4) white pearls are added to cake and its decoration.

Dimension : A2 card or 4.25" x 5.5"
Type : Vertical fold
Inlay : None

This card is entering the challenge(s) organized by :
1) Tuesday Morning Sketches #369 (ends by 18 September 2016)
2) Deep Ocean Challenge - Challenge #137 - Bingo (ends by 19 September 2016) - I choose pearls, flowers and lace
3) Lawnscaping Challenge 137 - Texture (ends by 14 September 2016)
4) Seize the Birthday - Frames (ends by 20 September 2016)

Supplies used:
Copic marker used: G07, N1, R85, RV63, T2 and YG67

Sunday, September 11, 2016

Trio Lanterns Shine Brightly

Trio Lanterns Shine Brightly
Finally I could say that this is my Mid-Autumn Festival 2016 last card as I believe I had made enough cards to give away this year.

CAS(E) This Sketch #189
For this card, I am adopting CAS(E) This Sketch #189 as shown above. I made two (2) cards for the same sketch and only rotating my images' colors.

Close-up: Trio lanterns randomized pattern #1
I decided to paper piece the lanterns. Thus, I stamp the lanterns onto some polka dots pattern papers and trim them accordingly. On a red card stock, the lanterns are stamped again with its hanging line. The trimmed lanterns are attached onto the matching lanterns. A purple metallic card stock is circle die cut at the upper part. Then, it is attached onto the red card stock using foam tape so that it is dimensional.
Close-up: Trio lanterns randomized pattern #2

Close-up: Embossed sentiment in gold
The sentiment is stamped onto a vellum strip and gold embossed. It is attached across the purple metallic card stock circle as shown in the sketch. Later, the whole panel is attached onto a yellow card base.

Dimension : A2 card or 4.25" x 5.5"
Type : Horizontal fold
Inlay : None

This card is entering the challenge(s) organized by :
1) CAS(E) This Sketch #189 (ends by 15 September 2016)
2) Brown Sugar Challenge #215 - Anything Goes (ends by 15 September 2016)
3) Crafty Girls Creation Challenge 25 Anything Goes (ends by 22 September 2016)

Supplies used: