|
| Dandelion Thanks |
 |
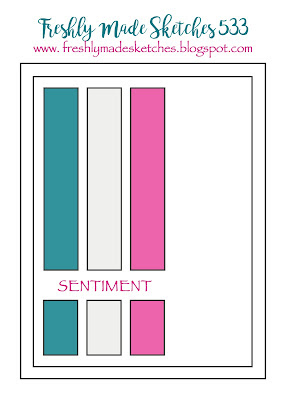
| Freshly Made Sketches #534 - A Sketch by Cécile |
I am adopting the sketch from Freshly Made Sketches #534 - A Sketch by Cécile as shown above where I made one horizontal and one vertical card using the same sketch.
 |
| Dandelion Thanks - horizontal design (original sketch) |
The dandelion image is stamped onto an inverted corner rectangle of white cardstock at the position shown on the sketch.
 |
| Dandelion Thanks - vertical design |
The word 'thanks' is die-cut from white cardstock and flower background pattern paper. The white die-cut is stacked-up twice and finished off with the pattern paper die-cut. This is following Jennifer McGuire's style of creating dimension which is also good in using up those scraps. The inverted corner panel is attached to the green card base.
 |
| Close-up: Sparkled dandelion |
The card is finished by adding some glitter to the word 'thanks' and dandelion to make them sparkle and shine.
 |
| Close-up: Sparkled 'Thanks' |
This card is entering the challenge(s) organized by:
1) Freshly Made Sketches #534 - A Sketch by Cécile (ends by 9 May 2022)
2) Cheers & Challenges Eclectic Ensemble CCEE2217 - National Dandelion Day! (ends by 12 May 2022)
3) Your Next Stamp - Challenge #183 – Flower Power (ends by 12 May 2022)
4) CASology - Week #403 - Botanical (ends by 6 June 2022)
Supplies used:
Stamp used:
1) Papercraft Essentials Issue 120 All-occasion Stencil and Stamp Freebies
Dies used:
1) Taylored Expressions (TE) Thanks
2) Unbranded Inverted Corner Rectangles