Saturday, October 22, 2016

One Layer Stenciled Thank You for All That You Do!

One Layer Stenciled Thank You for All That You Do!
This is the second project of the day and I am continuing my hand-made cards for some of my associates that helped me in my recent case and situation. I been chasing them like crazy people for last few days of my case dateline and I am sure a lot pressures are on their shoulder. Thus, I hope these cards will show them how much I really appreciate their helps, urgent and priority on my case.

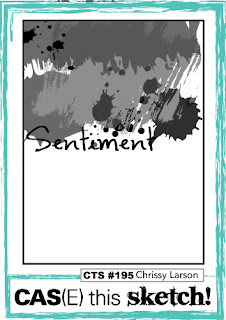
CAS(E) This Sketch #195
For these cards, I am adopting CAS(E) This Sketch #195 as shown above. For the second card, I am top mirroring the original sketch. I decided to make a simple and one layer card as the target receivers are male.

Close-up: One Layer Stenciled Thank You for All That You Do! - original sketch
On the white card base, three (3) distress colors are apply onto the stencil on the bottom and top half of the card base.
Close-up: One Layer Stenciled Thank You for All That You Do! - top mirror sketch
Close-up: Sentiment on the original sketch
Then, the sentiment is stamped accordingly as in sketch.
Close-up: Sentiment on the top mirror sketch

One Layer Stenciled Thank You for All That You Do! card and matching envelope
I also made matching envelopes for these cards by stenciling the same design onto the envelope flap but only using one distress color instead of the three (3) distress colors. Just a little something to make the blank envelope more interesting. :P

Dimension : A2 card or 4.25" x 5.5"
Type : Top fold
Inlay : None

This card is entering the challenge(s) organized by :
1) CAS(E) This Sketch #195 (ends by 27 October 2016)
2) Brown Sugar Challenge #221 - Anything Goes (ends by 27 October 2016)
4) Little Miss Muffet Challenge #149 - Anything Goes (ends by 02 November 2016) 

Supplies used:

3D Rose Just Wanted to Say Thank You for All Your Help

3D Rose Just Wanted to Say Thank You for All Your Help
Made these cards for some of my associates that helped me in my recent case and situation. I been chasing them like crazy people for last few days of my case dateline and I am sure a lot pressures are on their shoulder. Thus, I hope these cards will show them how much I really appreciate their helps, urgent and priority on my case.


Viva la Verve Sketches - October Sketch 2
For this card, I am adopting Viva la Verve Sketches - October Sketch 2 as shown above. Nowadays, I am saving up some time by making two (2) cards using one (1) sketch either by mirroring or rotating the sketch. By doing so, I really can share more times as well as built up my cards stash!


Close-up: 3D Rose Just Wanted to Say Thank You for All Your Help - original sketch
I decided to make my signature 3D flower for this card. I stamp flower image three (3) times and colored them in Copic markers. One of them is die cut using the matching die while the other two (2) are trimmed accordingly to the portion I need. The leaves are stamped on a green card stock using green ink and die cut.


Close-up: 3D Rose Just Wanted to Say Thank You for All Your Help - 180 degree rotated sketch
On a trimmed vellum, I did some dry embossing. This is my first attempt of using vellum in dry embossing and it turned out well! The embossed vellum is then attach onto a yellow card base as in sketch.


Close-up: Sentiment in fishtailed banner
On an orange card stock, the sentiment is stamped and fishtailed on both ends. It is attached onto the card base, one on the bottom and another one on top.


Close-up: 3D rose with shimmer
Then, the base of the flower that die cut with matching die and leaves are assemble and attach onto the card base as in sketch. The 3D flower is then built upon it using foam tape.

As final touch, I add some shimmer onto the flower and fill the 'Thank You' sentiment space to make it all shine and nice! Two (2) white pearls are also added to the start and end of the sentiment sentence.


3D Rose Just Wanted to Say Thank You for All Your Help card and matching envelope
I also made matching envelopes for these cards by stamping the similar flower and leaves onto the envelope flap. This is my first time made a matching envelope and I just love it!


Dimension : A2 card or 4.25" x 5.5"
Type : Vertical fold
Inlay : None

This card is entering the challenge(s) organized by :
1) Viva la Verve Sketches - October Sketch 2 (ends by 03 November 2016)
3) Brown Sugar Challenge #221 - Anything Goes (ends by 27 October 2016)
5) Little Miss Muffet Challenge #149 - Anything Goes (ends by 02 November 2016) 

Supplies used:
Copic marker used: R20, R29, R35 and YG03

Tuesday, October 11, 2016

Gate-Folded Thank You Mini Cards


Gate-Folded Thank You Mini Cards
Made this mini card for one of my returning Copic markers buyers. I am really appreciate for his support on my mini business!

Sketch Saturday Week #433
For this card, I am adopting Sketch Saturday Week #433 as shown above. This sketch has prompted me to make a gate-folded card which is just perfect for few challenges that call for fancy or many fold cards!

As I decided to make gate-folded mini card, the space is really limited. Thus, I opt for die cut sentiment which prompt me to make two (2) cards using both the negative and positive die cut. I only need one card but I can keep  another one for later use. 


Gate-Folded Thank You Mini Cards - mirror sketch version using negative die
First, I die cut circles from metallic card stock that have mirror effect as well from green sticker. The metallic circles will be the base in which I layer both the negative and positive die cut onto it. The 'Thank You' sentiment is die cut onto the green sticker circles. The sticker elements really helps to adhere things faster and nicely onto the metallic circles.

On a pale yellow card bases, I die cut the 'gate' to make a nice gate edges. Then, the metallic circles are adhere onto the gate as in sketch, one to the left and another to the right. One card will follow the sketch exactly and another one will be mirror of it, thus the left and right.


Gate-Folded Thank You Mini Cards - original sketch version using positive die
For little embellishment and to help the gate-folded card stay closed, I stamp two (2) birds that have one look to the front and another look to the right direction. They are colored using Copic markers and I added some pattern to their scarf using silver glitter pen, dots for the bird look to the front and stripes for the bird looking to the right. Then, they are die cut using the matching die and adhere to the card base as in sketch using dimensional dots. The birds are placed just nice to make a simple snap to hold the metallic circles in close mode.

Inside the card bases, a blue trimmed card stock is layered onto them. I also die cut another two (2) white circles to attach on top of the blue layer that coordinate its position with the metallic circles. The white circles will be like hidden message space behind the metallic circles.

Dimension : 3" x 3"
Type : Gate fold
Inlay : Yes

This card is entering the challenge(s) organized by :
1) Sketch Saturday Week #433 (ends by 15 October 2016)

Supplies used:
Copic marker used: BG05, R24 and Y19