Showing posts with label Papercraft Essentials. Show all posts

Sunday, May 08, 2022

Dandelion Thanks

Dandelion Thanks
Teacher's Day is coming and thus I made some thank you cards.

Freshly Made Sketches #534 - A Sketch by Cécile
I am adopting the sketch from Freshly Made Sketches #534 - A Sketch by Cécile as shown above where I made one horizontal and one vertical card using the same sketch.

Dandelion Thanks - horizontal design (original sketch)
The dandelion image is stamped onto an inverted corner rectangle of white cardstock at the position shown on the sketch.

Dandelion Thanks - vertical design
The word 'thanks' is die-cut from white cardstock and flower background pattern paper. The white die-cut is stacked-up twice and finished off with the pattern paper die-cut. This is following Jennifer McGuire's style of creating dimension which is also good in using up those scraps. The inverted corner panel is attached to the green card base.

Close-up: Sparkled dandelion
The card is finished by adding some glitter to the word 'thanks' and dandelion to make them sparkle and shine.
Close-up: Sparkled 'Thanks'

This card is entering the challenge(s) organized by:
4) CASology - Week #403 - Botanical (ends by 6 June 2022)

Supplies used:
Stamp used:
1) Papercraft Essentials Issue 120 All-occasion Stencil and Stamp Freebies

Dies used:
1) Taylored Expressions (TE) Thanks
2) Unbranded Inverted Corner Rectangles

Tuesday, October 11, 2016

Gate-Folded Thank You Mini Cards


Gate-Folded Thank You Mini Cards
Made this mini card for one of my returning Copic markers buyers. I am really appreciate for his support on my mini business!

Sketch Saturday Week #433
For this card, I am adopting Sketch Saturday Week #433 as shown above. This sketch has prompted me to make a gate-folded card which is just perfect for few challenges that call for fancy or many fold cards!

As I decided to make gate-folded mini card, the space is really limited. Thus, I opt for die cut sentiment which prompt me to make two (2) cards using both the negative and positive die cut. I only need one card but I can keep  another one for later use. 


Gate-Folded Thank You Mini Cards - mirror sketch version using negative die
First, I die cut circles from metallic card stock that have mirror effect as well from green sticker. The metallic circles will be the base in which I layer both the negative and positive die cut onto it. The 'Thank You' sentiment is die cut onto the green sticker circles. The sticker elements really helps to adhere things faster and nicely onto the metallic circles.

On a pale yellow card bases, I die cut the 'gate' to make a nice gate edges. Then, the metallic circles are adhere onto the gate as in sketch, one to the left and another to the right. One card will follow the sketch exactly and another one will be mirror of it, thus the left and right.


Gate-Folded Thank You Mini Cards - original sketch version using positive die
For little embellishment and to help the gate-folded card stay closed, I stamp two (2) birds that have one look to the front and another look to the right direction. They are colored using Copic markers and I added some pattern to their scarf using silver glitter pen, dots for the bird look to the front and stripes for the bird looking to the right. Then, they are die cut using the matching die and adhere to the card base as in sketch using dimensional dots. The birds are placed just nice to make a simple snap to hold the metallic circles in close mode.

Inside the card bases, a blue trimmed card stock is layered onto them. I also die cut another two (2) white circles to attach on top of the blue layer that coordinate its position with the metallic circles. The white circles will be like hidden message space behind the metallic circles.

Dimension : 3" x 3"
Type : Gate fold
Inlay : Yes

This card is entering the challenge(s) organized by :
1) Sketch Saturday Week #433 (ends by 15 October 2016)

Supplies used:
Copic marker used: BG05, R24 and Y19

Sunday, May 15, 2016

Apple Teacher's Day Cards

Apple Teacher's Day Cards
Tomorrow is my daughter school Teacher's Day celebration and I only prepared the gifts but not the cards! Thus, I am rushing the Teacher's Day cards now which I managed to get them done in time! Phew~

As I need to make a bunch of cards in a limited time, I opt for the fastest way which is mass produce a series of same cards. Thanks to the My Favorite Things (MFT) Red Delicious Die-namics which I bought last year, I am finally have the chance to use it. Furthermore, I did purposely purchase My Favorite Things (MFT) Red Delicious Die-namics for making Teacher's Day appreciation cards.

First, I die cuts a number of the apple bodies, follow by the white circle cards which will be sandwiched inside the apple body to create a card, the stems and leaves. After all the items has been die cuts, the sandwich cards inside the apple body are assembled. Then follow by the stem and leave.

Apple Teacher's Day Cards with Thank You Teacher sentiment
On the front of the apple body, I die cut two (2) different 'thank you' sentiments from my stash on two (2) colors sticker card stock as it is easier to assemble on the apple body due to the die cut delicacy. As the other 'thank you' sentiment die cut is not occupying as much space as the floral 'thank you' sentiment die cut, I die cut another sentiment, 'teacher' on sticker card stock as well to form 'thank you teacher' sentiment instead. At least there are some variety in sentiment and colors. :P

Apple Teacher's Day Cards with floral Thank You sentiment
Finally, some gems are added to the flowers of the floral 'thank you' sentiment die cut. While on the other design apple, one (1) medium and one (1) small yellow gems are added to mimic the shine on an apple.

Luckily my son's kindergarten Teacher's Day celebration has been postponed to Friday, 20 May 2016 which allow me sometimes to mass produce another set of Teacher's Day cards.

Supplies used:

Sunday, April 17, 2016

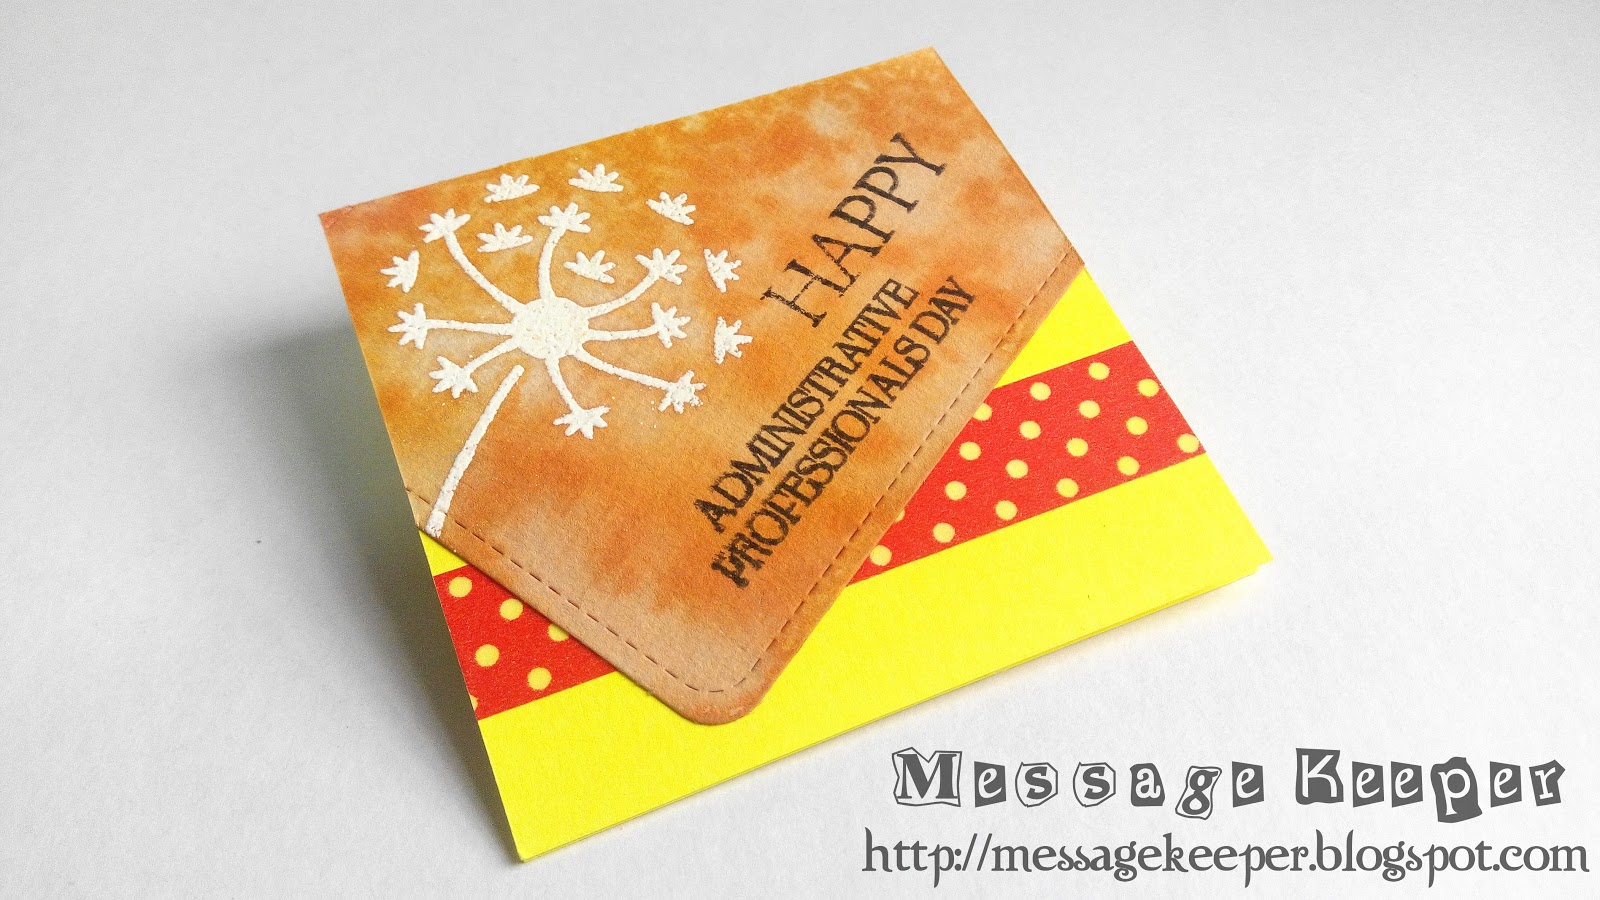
Dandelion Happy Administrative Professionals Day

Dandelion Happy Administrative Professionals Day cards

Sketch Saturday Week #408
For this card, I am adopting Sketch Saturday Week #408 as shown above and is inspired by Cheers & Challenges Eclectic Ensemble CCEE1615 - One Layer with Water Color. I decided to make two (2) using the same sketch where one of the card follow the original sketch as shown above and another card mirror the original sketch. It does not make a big different in layout but the image and sentiment will define that.

Dandelion Happy Administrative Professionals Day card - the original sketch
The dandelion is stamped on a stitched card journal watercolor paper die cut and embossed using white embossing powder. Then, good coating of distress inks are applied to the card journal and spray with water to create the watercolor background.

Dandelion Happy Administrative Professionals Day card - the mirror sketch
On a yellow card base, a transparent dotted with red background washi tape is attached onto the card base as shown in the sketch. Then, the journal card is attached to the angle as shown in the sketch and its excess are trimmed off.

Finally, the sentiment is stamped accordingly.

Dimension : 7.62cm x 7.62cm or 3" x 3"
Type : Top fold
Inlay : None

This card is entering the challenge(s) organized by:
1) Sketch Saturday Week #408 (ends by 22 April 2016)
3) AAA Cards - Game #62 Anything Goes (ends by 23 April 2016)

Stamps and tools used:

Tuesday, January 12, 2016

Free Thank You Dies with Papercraft Essentials Issue 128

Papercraft Essentials issue 128 cover
The freebies on Papercraft Essentials Issue 128 is just my things as it is a Creative Dies 'thank you' dies!

Papercraft Essentials issue 128 freebies - Creative Dies 'Thank You' dies
I just need to have the 'thank you' dies so badly as I like making thank you cards even it is priced at RM40.80! The design is just so nice and smooth. There are amazing samples and inspirations inside the magazine as well.

One of the titles or features in the cover page also strike my eyes. It is the 'tea bag folding' which I do not know anything about it. I like to discover that and hopefully is a new skill or technique I can apply to my card making.

By the way, I think the Creative Dies 'thank you' dies is sponsored by Craft Stash as there is a banner behind the dies packaging that has its name and address.

Friday, May 22, 2015

Free All-Occasion Stencil and Stamp Set with Papercraft Essentials Issue 120

Papercraft Essentials issue 120 cover
I just love the free All-occasion stencil and stamp set that come with Papercraft Essentials issue 120

That dandelion flower is just so beautiful and I just love it when I lay my eyes on it! Apart from that, those music notes, both in the stencil and stamp set are just perfect for some cards that calling for the use of music notes!
Papercraft Essentials issue 120 freebies - All-occasion stencil and stamp set
I also like the 'Happy Birthday' sentiment in stencil form which I can use it with some of the new techniques I been seeing and learning 'virtually' for stencil.

Other than the inspirations/ideas and instructions inside the magazine on how to use the stencilr and stamp, at the back of free stencil and stamp packaging, there also a suggestion lists on what techniques you can try with the stencil and stamp.

I hope I can just just can get them inky at soonest!

Friday, April 10, 2015

Free Design-a-Flower with Papercraft Essentials Issue 117

Papercraft Essentials issue 117 cover
Papercraft Essentials is having a free Design-a-Flower embossing folder and stamp set on its issue 117.

Since I do not have much flower related stamp sets, this freebies really caught my eyes and heart. The sentiments in this set are wonderful as well and great for many occasions! The embossing folder is a bonus as it is a border embossing folder which I do not have such in my collection currently.
Papercraft Essentials issue 117 freebies -  Design-a-Flower embossing folder and stamp set
Although the magazine is cost at RM39.90 which is a bit expensive, the value of the freebies just make it worth. Furthermore, there is inspirations/ideas and instructions on how to make sure of the free Design-a-Flower embossing folder and stamp set inside the magazine. Not to mention things I can learn from the magazine.

At the back of the embossing folder and stamp packaging, there are some simple instructions and guides on how to use the stamps inside the set by designing different  and varieties flowers designs.