Showing posts with label Embossing. Show all posts

Wednesday, November 25, 2020

Flower HB2U

Flower HB2U

Today I am making another birthday card for my daughter whose birthday is on tomorrow, 26 November 2020. If you notice, a few days ago, I also made a birthday card for my son. Yes, you guessed correctly. My kid's birthday is 4 days apart and so is my husband's birthday which falls on 18 November.

Try Stampin' On Tuesday Challenge #485 with Optional Theme: Non-Traditional Christmas

For this card, I am adopting the sketch from Try Stampin' On Tuesday Challenge #485 with Optional Theme: Non-Traditional Christmas as shown above where I opt out of the theme.

Close-up: The flower and sentiment

The flower from Hero Arts CL377 Be Happy which was few years old is stamped on a white stitched rectangle and colored using Copic markers except the pollen of the flower. The sides are toned down using distress ink. It is matted onto a blue glitter card stock.

For the background, strips of rainbow colors are created using watercolor. The rainbow panel is trimmed to the size as in the sketch and attached to an orange card base. For the middle strip, a strip of white card stock is dry embossed and attach to the card base as in the sketch.

Close-up: The glitter and rainbow gems on the flower

The flower panel is attached to the card as in the sketch. The sentiment is stamped on a yellow banner and attached to the card using foam tape. The card is finished by adding some rainbow gems to the pollen of the flower to give some dimension. Lastly, some glitter is applied onto the petals to make it sparkle.

This card is entering the challenge(s) organized by:
1)
Retro Rubber Challenge Blog - Challenge 148 - They Said It's Your Birthday! (ends by 27 November 2020)
2) Lavinia World Challenges #40 - Anything Goes (ends by 30 November 2020)
3) Lemon Shortbread Challenge - Challenge #133 - Anything Goes (ends by 30 November 2020)
Supplies used:
Stamps used:
1) Hero Arts CL377 Be Happy
2) My Favourite Things (MFT) Lollipop Additions - Birthday (for the sentiment)

Embossing Folder and Dies used:
1) Darice Heart Background Embossing Folder
2) Unbranded Stitched Rectangle Stackables Dies

Sunday, March 29, 2020

Monster Birthday Cards

Monster Birthday Cards
I am back today to make some cards especially during this Restricted Movement Control/Movement Control Order (RMO/MCO) period. It will be waste of time if I do not use these times for some cards making to  replenish my cards supply!

MFT Wednesday Sketch Challenge - Sketch 482 (MFTWSC482)
I am adopting the sketch from MFT Wednesday Sketch Challenge - Sketch 482 (MFTWSC482) as shown above where one (1) card I make as horizontal and another one (1) as vertical.

Close-up: Monster Birthday Card - horizontal
Few monsters and the space ship are stamps onto white cardstock and colored using Copic markers. One of the monster, I gave it some black spots using Copic Multi Liner by drawing small black spots all over its body and it looks like a cookie monster which it really look like one after I done giving it some black spots😛Once done, they are die cut with matching dies.

Close-up: Monster Birthday Card - vertical
On a purple and blue metallic cardstock, the sentiments are stamped and heat embossed using white embossing powder. Then they are adhered onto a blue card bases. The monsters and space ships are adhered on to the panel using foam tape to give some dimension.

Close-up: Googly eyes and shimmering on monster eye and tentacles
Googly eyes are attached onto each of the monsters' eyes to give it some playful and funny feelings.

Close-up: Shimmering on the monster body and space ship window 
Finally, some shimmers are applied to the green single eyed monster's eye white, purple monsters' tentacles, cookies monster's body and the space ship windows.


This card is entering the challenge(s) organized by:

2) CAS on Friday - Challenge #176 - Birthday (ends by 01 April 2020)


Supplies used:
Copic markers used: B02, BV04, BV13, BV17E00, E31, E50, R20, R29, R35, W1, W3, W5, YG03, YG13 and YG17
Stamps used: Clearly Besotted Stamps Out of This World and unbranded stamp set

Saturday, December 17, 2016

Embossed Background Wedding Card and Tag

Embossed Background Wedding Card and Tag
Made this card and little tag for my cousin sister who is having her dinner reception for Malaysia relatives and friends tomorrow. She is married to Singaporean and had their church wedding and luncheon reception in Singapore last week. The card will be passed to her while the little tag will be inserted into the money angpau to indicate the angpau is from who.

I started off with arranging the heart images and 'love' wordings onto the acrylic block. Then, they are stamped onto watercolor paper and embossed using gold embossing powder. The same process is repeated with white embossing powder for the tag. Colors (inspiration from the wedding card invitation) are added to the embossed background.

Embossed Background Wedding Card
For the card, the sentiment is stamped onto an orange card stock and embossed using gold embossing powder. The gold embossed background is trimmed accordingly to fit the bottom and upper of the sentiment. They are layered onto the orange sentiment card stock using foam tape. Then, the whole panel is attached onto a yellow card base.
Close-up: The gold embossed sentiment on the wedding card

Embossed Background Wedding Tag
While for the tag, the sentiment is stamped onto a pink parchment stitched tag die cut using gold ink. The white embossed background is first die cut with stitched tag dies. Then, it is trimmed accordingly to fit the bottom and upper of the sentiment and layered onto the pink parchment stitched tag. Another white stitched tag is attached to the back of the pink parchment stitched tag for message writing.
Close-up: The gold embossed sentiment on the wedding tag

For finishing touch, I apply a layer of shimmer to both of the backgrounds to make them shine; after all, it is a wedding wishes card!

This card is entering the challenge(s) organized by:
2) Little Miss Muffet Challenge #153 - Anything Goes (ends by 29 December 2016) 

Supplies used:

Saturday, October 22, 2016

3D Rose Just Wanted to Say Thank You for All Your Help

3D Rose Just Wanted to Say Thank You for All Your Help
Made these cards for some of my associates that helped me in my recent case and situation. I been chasing them like crazy people for last few days of my case dateline and I am sure a lot pressures are on their shoulder. Thus, I hope these cards will show them how much I really appreciate their helps, urgent and priority on my case.


Viva la Verve Sketches - October Sketch 2
For this card, I am adopting Viva la Verve Sketches - October Sketch 2 as shown above. Nowadays, I am saving up some time by making two (2) cards using one (1) sketch either by mirroring or rotating the sketch. By doing so, I really can share more times as well as built up my cards stash!


Close-up: 3D Rose Just Wanted to Say Thank You for All Your Help - original sketch
I decided to make my signature 3D flower for this card. I stamp flower image three (3) times and colored them in Copic markers. One of them is die cut using the matching die while the other two (2) are trimmed accordingly to the portion I need. The leaves are stamped on a green card stock using green ink and die cut.


Close-up: 3D Rose Just Wanted to Say Thank You for All Your Help - 180 degree rotated sketch
On a trimmed vellum, I did some dry embossing. This is my first attempt of using vellum in dry embossing and it turned out well! The embossed vellum is then attach onto a yellow card base as in sketch.


Close-up: Sentiment in fishtailed banner
On an orange card stock, the sentiment is stamped and fishtailed on both ends. It is attached onto the card base, one on the bottom and another one on top.


Close-up: 3D rose with shimmer
Then, the base of the flower that die cut with matching die and leaves are assemble and attach onto the card base as in sketch. The 3D flower is then built upon it using foam tape.

As final touch, I add some shimmer onto the flower and fill the 'Thank You' sentiment space to make it all shine and nice! Two (2) white pearls are also added to the start and end of the sentiment sentence.


3D Rose Just Wanted to Say Thank You for All Your Help card and matching envelope
I also made matching envelopes for these cards by stamping the similar flower and leaves onto the envelope flap. This is my first time made a matching envelope and I just love it!


Dimension : A2 card or 4.25" x 5.5"
Type : Vertical fold
Inlay : None

This card is entering the challenge(s) organized by :
1) Viva la Verve Sketches - October Sketch 2 (ends by 03 November 2016)
3) Brown Sugar Challenge #221 - Anything Goes (ends by 27 October 2016)
5) Little Miss Muffet Challenge #149 - Anything Goes (ends by 02 November 2016) 

Supplies used:
Copic marker used: R20, R29, R35 and YG03

Sunday, September 11, 2016

Trio Lanterns Shine Brightly

Trio Lanterns Shine Brightly
Finally I could say that this is my Mid-Autumn Festival 2016 last card as I believe I had made enough cards to give away this year.

CAS(E) This Sketch #189
For this card, I am adopting CAS(E) This Sketch #189 as shown above. I made two (2) cards for the same sketch and only rotating my images' colors.

Close-up: Trio lanterns randomized pattern #1
I decided to paper piece the lanterns. Thus, I stamp the lanterns onto some polka dots pattern papers and trim them accordingly. On a red card stock, the lanterns are stamped again with its hanging line. The trimmed lanterns are attached onto the matching lanterns. A purple metallic card stock is circle die cut at the upper part. Then, it is attached onto the red card stock using foam tape so that it is dimensional.
Close-up: Trio lanterns randomized pattern #2

Close-up: Embossed sentiment in gold
The sentiment is stamped onto a vellum strip and gold embossed. It is attached across the purple metallic card stock circle as shown in the sketch. Later, the whole panel is attached onto a yellow card base.

Dimension : A2 card or 4.25" x 5.5"
Type : Horizontal fold
Inlay : None

This card is entering the challenge(s) organized by :
1) CAS(E) This Sketch #189 (ends by 15 September 2016)
2) Brown Sugar Challenge #215 - Anything Goes (ends by 15 September 2016)
3) Crafty Girls Creation Challenge 25 Anything Goes (ends by 22 September 2016)

Supplies used:

Friday, September 09, 2016

Shine Brightly with Embossed Gold Lanterns

Shine Brightly with Embossed Gold Lanterns
I am continuing my Mid-Autumn Festival cards today as the date to the festival is just next week. I hope I made enough cards to give away.

TGIF Challenges - TGIFC72 - Sketch
For this card, I am adopting TGIF Challenges - TGIFC72 - Sketch as shown above. The sketch is just perfect for the lanterns placement after I rotate it to the right!

Close-up: Embossed gold sentiment
I started out by stamping the lanterns and heat emboss them in gold. A line is hand drawn to connect the lanterns and heat embossed. The sentiment is stamped and heat emboss in gold as well.

Close-up: Embossed gold lanterns
Then, using distress ink, I colored the lanterns with clear Wink of Stella so that it will have shine on the lanterns that mimic the light glowing from within. In order to mimic the shine rays from the lanterns, a yellow ring is added to the edge of the lanterns using clear Wink of Stella.

Close-up: Shimmer on the lanterns
The background is applied with distress inks and later some water to mimic a night sky.

The scene is then attached onto a blue card base.

Dimension : A2 card or 4.25" x 5.5"
Type : Horizontal fold
Inlay : None

This card is entering the challenge(s) organized by :
1) TGIF Challenges - TGIFC72 - Sketch (ends by 15 September 2016)
2) Brown Sugar Challenge #215 - Anything Goes (ends by 15 September 2016)
3) CAS-ual Fridays CFC156 - Dimension & Bling (ends by 20 September 2016)
4) Crafty Girls Creation Challenge 25 Anything Goes (ends by 22 September 2016)

Supplies used:

Tuesday, July 12, 2016

Boutique Border Sending Sincere Thanks

Boutique Border Sending Sincere Thanks
This is my four and last card of the day in my card making quest for my Thailand colleagues and this one is for another female colleague.

Catch the Bug Challenge Blog - Stella Says Sketch Challenge #411
For this mini card, I am adopting Catch the Bug Challenge Blog - Stella Says Sketch Challenge #411 as shown above which is perfect to integrate City Crafter Challenge Blog Week 320 - On the Border as well due to the blank space on the right of the sketch.


Close-up: The boutique border sentiment
The boutique border is die cut using watercolor paper. Then, the sentiment is stamped and embossed using white embossing powder. Distress inks are added to the surface of the boutique border to make the embossing sentiment more attractive.

A piece of pink parchment card stock is trimmed according to size and attached onto a purple card base as shown in the sketch. A white polka dots with red background is layered onto the pink parchment card stock follow by the boutique border sentiment using foam tape.


Close-up: The purple pearls in descending sizes
As final touch, three (3) sizes of purple pearls are attached onto the right bottom of the pink parchment card stock as shown in sketch.

This card is entering the challenge(s) organized by:

Supplies used:

Chalkboard with Stencil Friends Like You Are Far and Few

Chalkboard with Stencil Friends Like You Are Far and Few
My colleague from Thailand is coming to Kuala Lumpur this Saturday for a vacation trip. However, I am regret that I do not have opportunity to meet her in person as my own personal schedule is crashing with her. I must say it is so sweet of her and other colleagues that I work with that they wanted to bring me some Thailand's snacks through her. Thus, I want to prepare some small gifts and cards to return the favor. I will pass them to another department colleague who will be meeting her instead.

I need to make a total of four (4) cards and this is my first. I made mini cards as it will be inserted into a favor organza bag.

For the first card, it is for a male colleague. I decided to use chalkboard technique and pair with stencil masking with distress ink.


Close-up: Chalkboard sentiment
A panel is die cut and the sentiment is stamped and embossed with white embossing powder. It is attached onto the top of a green card base before further smear with white pigment ink to make it more like a chalkboard.


Close-up: The masked design from stencil
Then, on a piece of white card stock, the stencil is layout and masked using distress inks. It is then trimmed according size and attached onto the bottom of green card base.

Finally, a star is die cut from a silver metallic card stock and attach onto the card in between the card stock using foam tape. Four (4) white pearls are also added to the four (4) corners of the frame to make it more decorative.

This card is entering the challenge(s) organized by:

Supplies used:

Sunday, June 05, 2016

Lots of Hearts Wedding Congratulations

Lots of Hearts Wedding Congratulations
Made this card for one of my husband biker buddy who is having his wedding and dinner reception at Avillion Port Dickson. Initially only my husband will attend but after some confirmation and all, we decided to go as family. We also would like to take the opportunity to take the kids to the beach as promised.

Fusion Card Challenge - Something Blue
I am adopting the both the photo inspiration and sketch from Fusion Card Challenge - Something Blue as shown above even the challenge date has been past due. The photo just remind me of wedding cake.

Close-up: The groom and bride representative hearts
First, I stamp the hearts onto a trimmed white card stock and emboss them in gold embossing powder. Then, the background is distressed while leaving the hearts blank. The heart on the left is colored with blue to represent groom while the heart on the right colored in red to represent bride. I am using distress colors to color these hearts.

A washi tape that have red hearts pattern is attached onto a card yellow base as shown in the sketch follow by an alternate pink and red border sticker. The hearts background is then attach onto these strips using dimensional foam as shown in the sketch.

Close-up: Sentiment in embossed gold
The sentiment is stamped on a red strip and emboss using gold embossing powder as well. The strip is fish-tailed at the right end and layered onto the background as in sketch.

Close-up: Shimmers on the hearts
As final touch, some shimmers are added to the hearts as they are the main focus. Two (2) gems are added to the beginning and ending of the sentiment.

Dimension : 21.5cm x 10cm or 8.5" x 4"
Type : Top fold
Inlay : None

This card is entering the challenge(s) organized by:

Supplies used:

Sunday, April 17, 2016

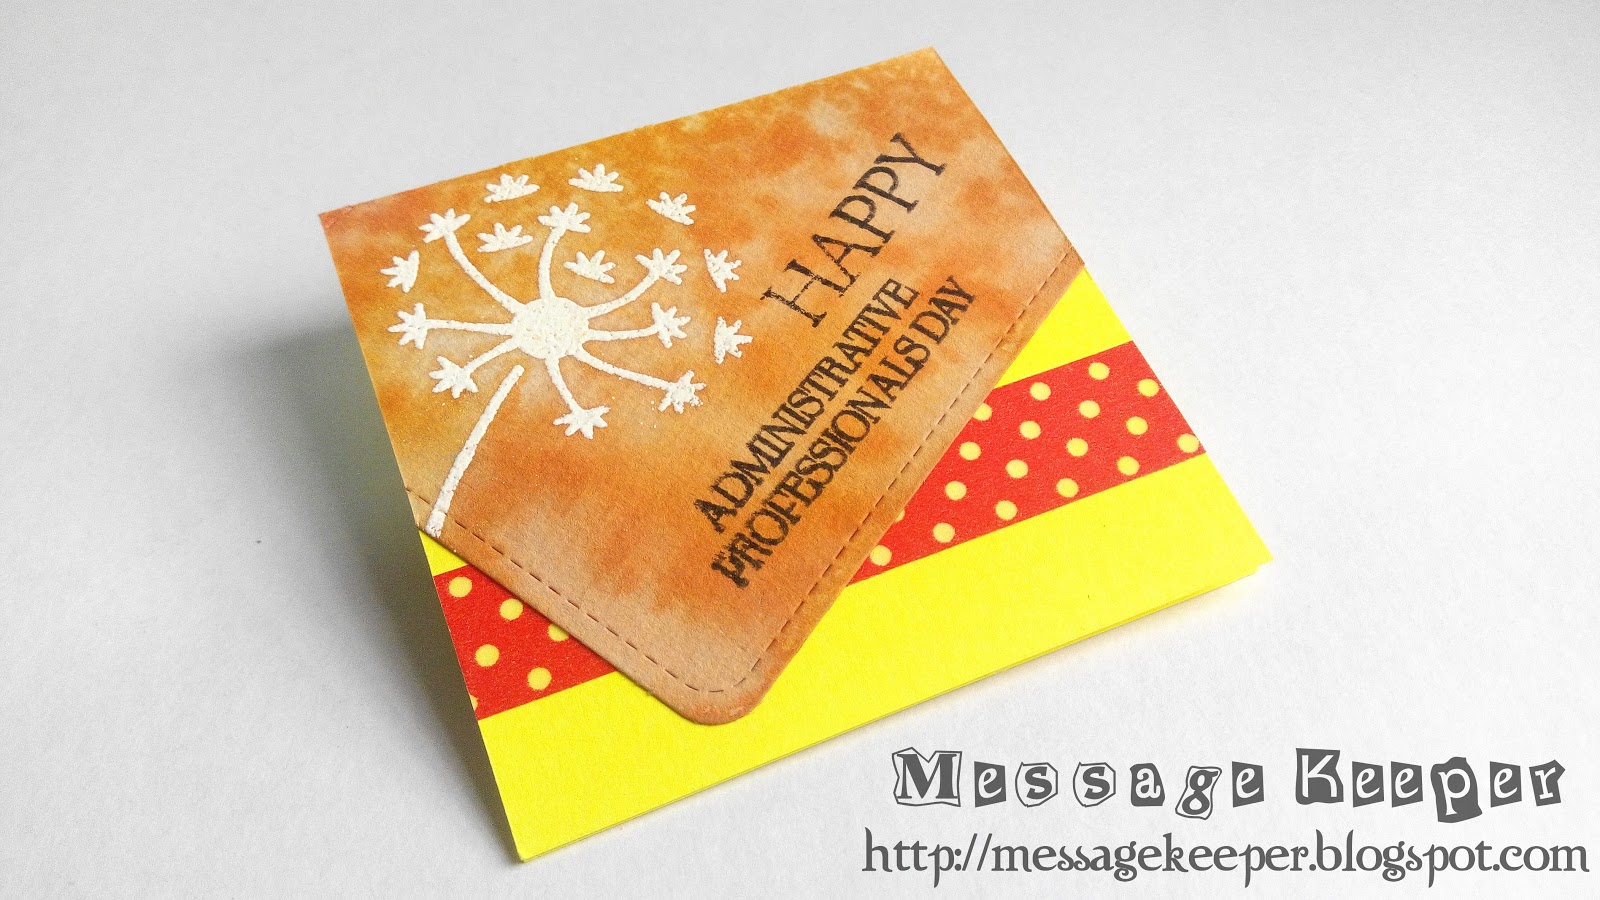
Dandelion Happy Administrative Professionals Day

Dandelion Happy Administrative Professionals Day cards

Sketch Saturday Week #408
For this card, I am adopting Sketch Saturday Week #408 as shown above and is inspired by Cheers & Challenges Eclectic Ensemble CCEE1615 - One Layer with Water Color. I decided to make two (2) using the same sketch where one of the card follow the original sketch as shown above and another card mirror the original sketch. It does not make a big different in layout but the image and sentiment will define that.

Dandelion Happy Administrative Professionals Day card - the original sketch
The dandelion is stamped on a stitched card journal watercolor paper die cut and embossed using white embossing powder. Then, good coating of distress inks are applied to the card journal and spray with water to create the watercolor background.

Dandelion Happy Administrative Professionals Day card - the mirror sketch
On a yellow card base, a transparent dotted with red background washi tape is attached onto the card base as shown in the sketch. Then, the journal card is attached to the angle as shown in the sketch and its excess are trimmed off.

Finally, the sentiment is stamped accordingly.

Dimension : 7.62cm x 7.62cm or 3" x 3"
Type : Top fold
Inlay : None

This card is entering the challenge(s) organized by:
1) Sketch Saturday Week #408 (ends by 22 April 2016)
3) AAA Cards - Game #62 Anything Goes (ends by 23 April 2016)

Stamps and tools used: