Showing posts with label My Creative Time. Show all posts

Sunday, February 13, 2022

Cupcake Wishing You the Best Birthday Ever!

Cupcake Wishing You the Best Birthday Ever! 
Initially, I plan to make some thank you or hello cards as I do not have these on my stash. But after seeing the Fusion Card Challenge - Valentine Cupcake challenge, I decided to use my long forgotten cupcake image. However, instead of Valentine's, I prefer birthday sentiment since tomorrow will be Valentine's Day and I do not need one now.
Fusion Card Challenge - Valentine Cupcake

Cupcake Wishing You the Best Birthday Ever! - Original Sketch 
First, stitched circles are die cut from white cards stock and stamped with the cupcake image. They are then colored using Copic markers.

Close-up: The sentiment - mirror sketch
Two (2) strips are trimmed from yellow cards stock for the sentiment. Four (4) thin strips are trimmed from dark purple leftover card stock. The sentiment stamped onto the yellow strips with one on the far left and another on the far right. When assembled, these cards will mirror each other. The yellow strips are attached to a blue and red card base. The purple stripes are attached above and below the yellow stripe to make it stand out.

Cupcake Wishing You the Best Birthday Ever! - Mirror Sketch
The cupcake images are attached to the card base as in the sketch, with one as original position as a sketch and another one as the mirror image. They are attached to the card base using foam for some dimensional instead of a flat card.

Close-up: The glitter on the hearts topping - original sketch
Finally, some glitters are applied to the hearts topping as no birthday should be celebrated without glitter, right? :)
Close-up: The glitter on the hearts topping - mirror sketch

This card is entering the challenge(s) organized by:
1) Fusion Card Challenge - Valentine Cupcake (ends by 16 February 2022)
2) Seize the Birthday #231 - Sparkle and Shine (ends by 15 February 2022)
4) Tic Tac Toe Challenge - TTTC148 - I choose heart, free, and stitching  (ends by 17 February 2022)
Supplies used:
Stamps used:
1) Hero Arts CG151 Happy Birthday Cupcakes
2) My Creative Time Wow So Many Candles

Dies used:
1) Unbranded Stitched Circles

Saturday, November 21, 2020

Cow Happy Happy Birthday Interactive Card

Cow Happy Happy Birthday Interactive Card

Is been sometimes I did not post anything since my last post in March 2020. Actually, I did make some cards after my last post but I just lazy or no time to post them. Nevertheless, I am back today for another card I made for my son's birthday which is coming this Sunday, 22 November 2020.

My son likes cows a lot. He has three (3) cow stuff toys that he love dearly and accompany him to sleep even he is already 9 years old! So, eventually, my birthday card to him is themed cow. I decided to make an interactive card as he voiced out last year that he wants something like his older sister's last year birthday card which is an interactive card.

Close-up: The cow, hays ad barn

The cow, hays and barn are stamps onto white cardstock and colored using Copic markers. Once done, they are die-cut with matching dies.

For the background, a white panel where some clouds and sun from a few older stamp sets are stamped. The sun is colored using Copic markers. Then, on a strip of green card stock, some grasses are stamped on it.

Close-up: The spinner circles

Two different spinner circles are die-cut onto the background to make the interactive card. The sentiment is stamped accordingly onto the background. Once the interactive card is assembled, the cow, hays, barn and strip of grass are attached to the background accordingly.

This card is entering the challenge(s) organized by:
5) Lavinia World Challenges #40 - Anything Goes (ends by 30 November 2020)

Supplies used:
Stamps and Dies used:
1) Hero Arts CL439 Kiss From the Sun (for the sun)
2) Hero Arts CL412 Prince Charming (for the cloud)
3) Lawn Fawn Critters at the Dog Park (for the grass)
4) My Creative Time WOW So Many Candles (for the sentiment)
5) Hello Bluebird Farmyard Little Bits
6) MFT Die-namics Circle Spinner Channels

Saturday, November 02, 2019

Cupcake Birthday Cards

Is been exactly one (1) year since I made my last card! Wow! Times really flies! A lot has been happening and due to that, I am kind lost my interest in making cards as time is really not permitting me to do so.
Cupcake Birthday Cards

Nevertheless, I am back today to make some cards as I really in need of some cards especially birthday cards for my colleague and my best friend who birthday already passed.

Freshly Made Sketches #409 - A Sketch by Jen M.
For this card, I am adopting the sketch from Freshly Made Sketches #409 - A Sketch by Jen M. as shown above. I also adopting Seize the Birthday #177 - Candles.

The cupcake with candle is stamped on white square parenthesis dotted dies and colored using Copic markers.

Close-up: Cupcake Birthday Card - original sketch

Then on a pink and blue card base, a craft strip is attached onto each of card bases as shown in the sketch. The sentiments are stamped on the craft cardstock accordingly.

Close-up: Cupcake Birthday Card - clockwise turn sketch

Then, the cupcake dies are attached onto the card base as shown in the sketch using foam tapes for dimension. Two (2) black strips are attached onto the craft strips top and bottoms for fake borders.

Close-up: Glossy accent flame, shimmering frosting and gems

For final touches, some glossy accents are added to the flames. Some shimmers are added to the cupcakes as well. Two (2) gems are added to left side of the candles just to give some effects.

Close-up: Glossy accent flame, shimmering frosting and gems

Dimension : A2 size (4.25" x 5.5" or 10.8cm x 13.9cm)
Type : Vertical and horizontal fold
Inlay : None

This card is entering the challenge(s) organized by:
1) 
Freshly Made Sketches #409 - A Sketch by Jen M. (ends by 04 November 2019)
2) 
Seize the Birthday #177 - Candles (ends by 05 November 2019)
3) Brown Sugar Challenge #295 - November 2019 - Anything Goes (ends by 03 November 2019)

Supplies used:
Copic markers used: B02, B24, BG01, E23, E29, E51, R24, R83, RV23, RV25, V15, Y17, Y18 and YR31
Stamps used: Hero Arts CL382 Wonderful Birthday and My Creative Time WOW So Many Candles

Dies used: Unbranded Square Parenthesis Dotted Stackables Dies

Saturday, September 24, 2016

Wish Big Monster Shaker Card

Wish Big Monster Shaker Card
Made this card for my best friend whose birthday is coming next month. But since she is in Singapore, I need to get the present and this card posted early so that it will arrive on time for her birthday.

MFT Wednesday Sketch Challenge - Sketch 299 (MFTWSC299)
For this card, I am adopting MFT Wednesday Sketch Challenge - Sketch 299 (MFTWSC299) as shown above and it is just perfect for challenge hosted by CAS-ual Fridays CFC157 - Shaker Card. I must admit that those confetti inside the shaker shape just remind me of party as challenge hosted by Cute Cards Thursday Challenge 444 - Party Time!

Close-up: The shaker circle
First, I die cut a white circle as the shaker base and also to stamp my image on. Then, I die cut a same size circle of acetate. Using a smaller circle die with the circle die I used to die cut the shaker base, I create a frame out of both circle dies so that I will have a rim/ring to build the shaker depth by die cutting from foam. In fact, I die cut two foam rim/ring so that I have the depth I needed. I also die cut a gold rim/ring to be attached at the most top layer of the shaker as decorative rim/ring to cover up every else (mostly ugly things) behind it. By this time, I did wish that I have Lawn Fawn Stitched Frame as die cut the frame by pairing two (2) sizes of circle dies together really do have its challenge.

Close-up: The sentiment and monster
The next thing I do is stamp the monster image and sentiment onto the white circle shaker base and color the monster with Copic markers. After coloring the monster, I give her some uniqueness by adding some mini spots under its horns as well as her webbed feet. With those mini spots, she just look different! More shimmer is added to her body as it is after all a birthday celebration and for me, needs lots of shine. :P
Close-up: Shinning monster (photo taken before the shaker is assemble)

Wish Big Monster Shaker Card - after it was shake
Then, it is time to assemble the shaker together. I use double sided tape as my medium instead of liquid glue as it is more manageable with double sided tape but it took some times as I need to peel shorter length of the tape due to the curvy of circle. I use some glitter confetti and gold steel ball bead nail art decoration as shaker elements.

Close-up: The panel - recycling from another project
As for the panel, I re-use leftover of masked stencil piece from this card. After the masked stencil piece is trimmed to size, it is attached onto a green card base as in sketch follow by the the shaker circle.

Dimension : A2 card or 4.25" x 5.5"
Type : Vertical fold
Inlay : None

This card is entering the challenge(s) organized by :
2) CAS-ual Fridays CFC157 - Shaker Card (ends by 04 October 2016)
3) Cute Cards Thursday Challenge 444 - Party Time! (ends by 28 September 2016)
4) Brown Sugar Challenge #217 - Anything Goes (ends by 29 September 2016)

Supplies used:
Copic marker used: R20, YG03, YG13 and YG17

Sunday, September 27, 2015

Flower and Bee Wishing You the Best Birthday Ever!

Flower and Bee Wishing You the Best Birthday Ever!
Made this card for a colleague whose birthday was on last Wednesday. I did not put a 'belated birthday' sentiment onto the card because I had wished her on Facebook and verbally on the same day. I promised her to give a birthday card on Monday. Thus, here I am with the card! :P

MFT Wednesday Sketch Challenge - Sketch 247
For this card, I adopt MFT Wednesday Sketch Challenge - Sketch 247 as shown above.

The grass, flower and bee are stamped on a white card stock and colored using Copic markers. Then a white polka dots on pink background pattern paper is trimmed to make a frame for the scene as shown in the sketch.

Close-up: Sentiment and border
The sentiment is stamped on a yellow strip and attached onto a yellow strip with punched border design. It is later attached onto the scene as shown in the sketch. The scene is attached onto a pink card base using a big piece of foam so that it have some dimension.

Close-up: Flower and bee
The card is finished by adding some white pearls to the pollen of the flower to give some dimension. Two (2) smaller purple gems are also add to the bee's antennas. Lastly, I apply some glitter onto the bee's wings to make it sparkle.

Dimension : 10.1cm x 15.2cm or 4" x 6"
Type : Horizontal fold
Inlay : None

This card is entering the challenge(s) organized by :
1) MFT Wednesday Sketch Challenge - Sketch 247 (ends by 29 September 2015)
4) Seize the Birthday - Border Punches or Die Cuts (ends by 06 October 2015)

Supplies used:
Copic markers used: BG01, E35, E37, R20, R81, R83, R85, Y19, YG03, YG17 and YG25 

Tuesday, January 20, 2015

Wish Big.....

Wish Big.....
Made this birthday card for my colleague whom I promised earlier. Her birthday is on this Thursday.

Retrosketches #149
I adopt the simple sketch from Retrosketches #149 as shown above as I want to make a quick and simple card.

Close-up: Flower background
First, I stamp the flower repetitively onto a white card stock in pink so that it would be the background or own made pattern paper. Then, I purposely made a tear to the upper left corner as the sketch inspired me to have such idea! Then, the flower background is attached onto a pink card stock.

Close-up: Scalloped square tag
A rounded corners yellow square is stamped with the sentiment and attached with foam tape onto a green scalloped square die cut. At the left corner slit of the green scalloped square die cut, a gold ribbon is tied to it as in the sketch. Then, it is attached onto the pink card base using foam tape as in the sketch.

Dimension : 10.16cm x 15.24cm or 4" x 6"
Type : Vertical fold
Inlay : None

This card is entering the challenge(s) organized by :
1) Retrosketches #149 (ends by 23 January 2015)

Stamps and tools used :

Saturday, October 19, 2013

Perfection 3D Rose Birthday

Perfection 3D Rose Birthday
Made this last minute birthday card for my childhood best friend whose birthday is on tomorrow again! I did the same last year and she live in Singapore! Well, when this birthday card reach to her, its gonna be a belated birthday wishes.....haiz! Sorry, my dearest friend! I will try to make up to yo next time you back to Malaysia or next year!


Clean and Simple Stamping - FTL263
This card layout is inspirational from Clean and Simple Stamping - FTL263 sketch/challenge as shown above. I adopt this sketch as I plan to make another 3D rose as previously did! So in love with the 3D effect that the rose brings!


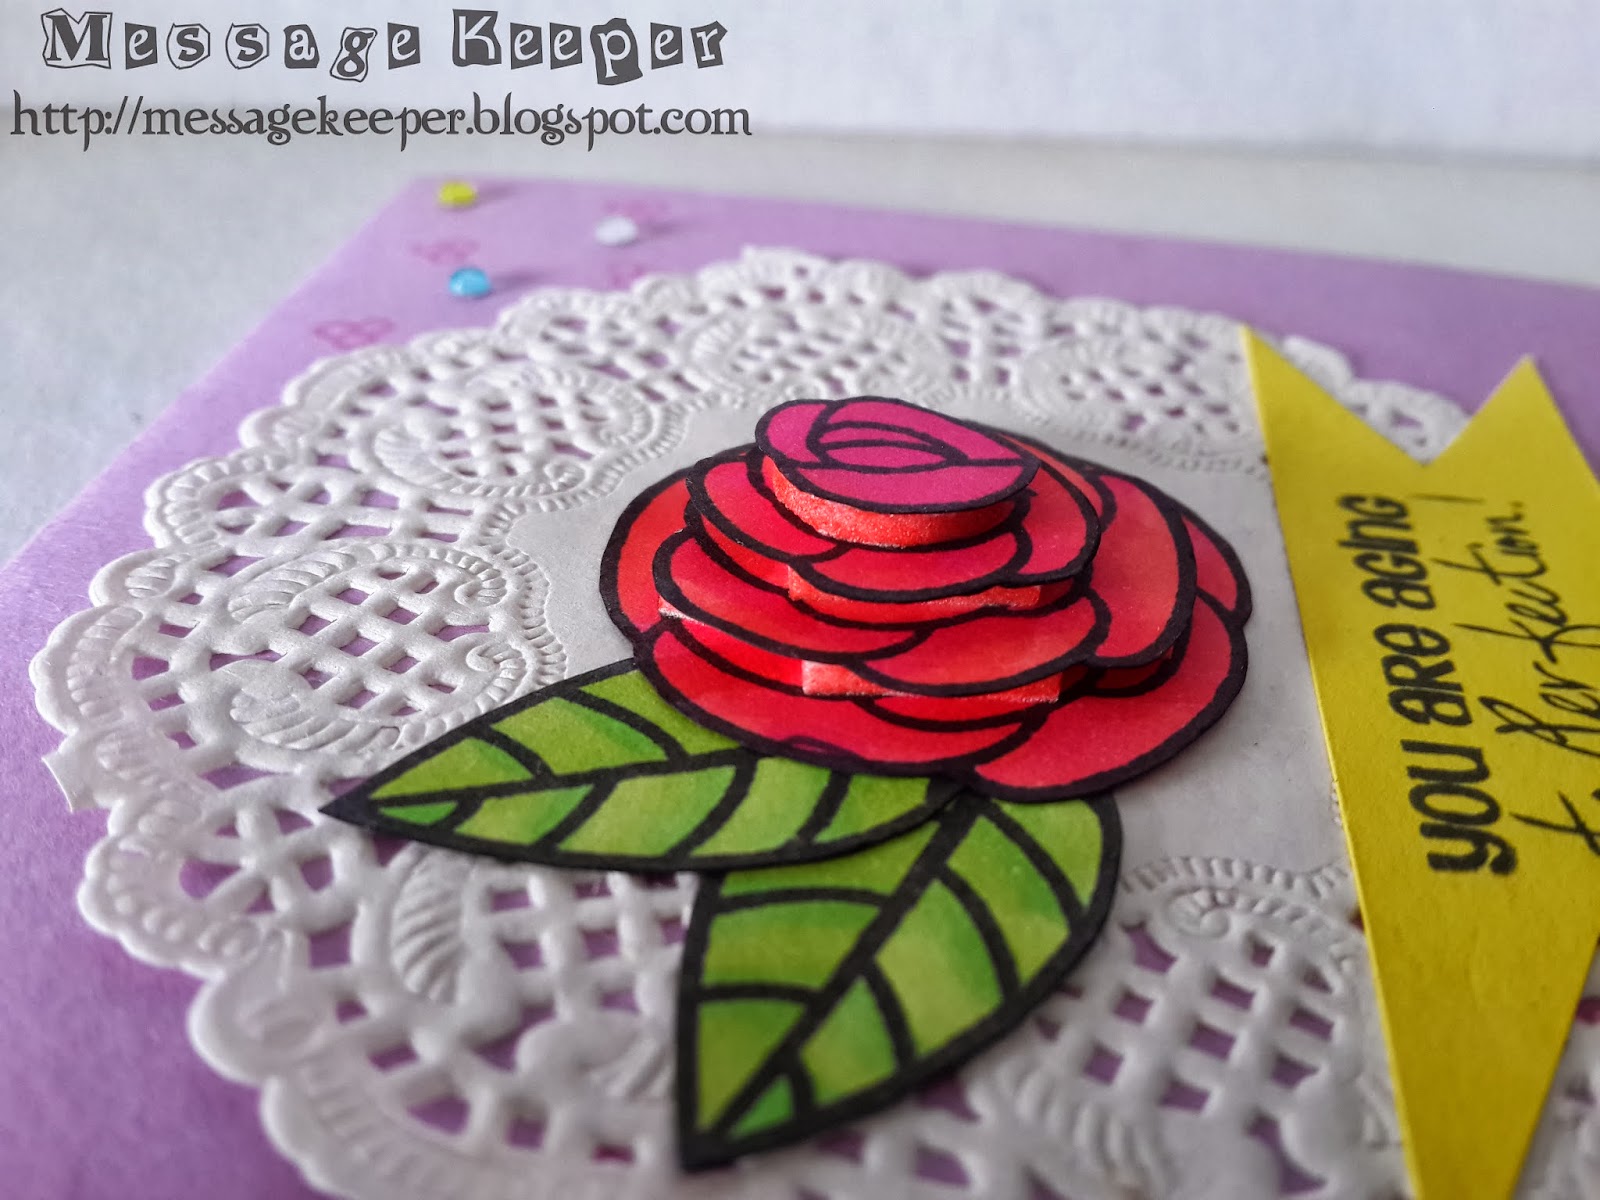
Close-up : 3D rose with the pop dots colored
On a white card stock, four (4) roses are stamped and colored using Copic markers. Then, the four (4) colored roses trimmed so that they can be layered upon each to create some dimension using pop dots. Two (2) leaves are tucked behind the rose as decoration as shown in the sketch. I learnt a little lesson back when I made the another 3D rose. Well, it is the pop dots thing whereby the white pop dots will show under the layers. Thus, this time, I colored the side of the pop dots using one of the color I colored the rose.


Close-up : The doily, 3D rose and sentiment
On a purple card stock, a small background is used to stamp the pattern randomly as in sketch. Then, a white paper doily is attached onto the card base as in sketch. This is my first time use paper doily in my card! The 3D rose is attached to the top center of the doily.


Close-up : Sentiment
The sentiment is stamped on a yellow card stock and fish tailed at the two ending. It is attached onto the doily below the 3D rose as in the sketch.


Close-up : Colorful gems scattered
The card front is finished off with some colorful gems scattered as shown in the sketch.


Perfection 3D Rose Birthday - Inside
Inside the card, a darker yellow paper is used as inlay. On the center of the inlay, another sentiment is stamped. Some flowers are stamped to the side of the sentiment to give some personalize. The stamped flowers are colored with Copic markers and some silver glitter is added to the center of the flowers.
Close-up : Sentiment inside

Dimension : 10.16cm x 15.24cm or 4" x 6"
Type : Horizontal fold
Inlay : Yes with stamped sentiment and images

If you would like to have a similar design of these items or individual item, please fill up the custom order form here. Please do include the color or theme you prefer, purpose of the item(s) (farewell, retirement, birthday and etc) and message (if any).

This card is entering the challenge(s) organized by :

Stamps and tools used :